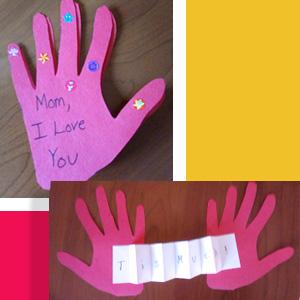
Supplies:

  • 1 CD Case (empty) with clear cover or small shallow square gift box without lid.
  • 1 piece of cardboard cut from cereal box
  • 1 piece of colored construction or printer paper
  • Small pieces of colorful scrap paper
  • 1 barcode cut from any cardboard or paper product
  • Liquid glue and/or glue sticks
  • Scissors
  • Miscellaneous small items--Examples: Stickers (especially Foamies), bottle caps or other small plastic lids.
  • Craft bling: small Beads, pipe cleaner pieces, buttons, paper clips or tiny binder clips, circle stickers (file folder labels), bendable straws (pieces), tiny flat or connector LEGO pieces, very small keys, old puzzle pieces, metal nuts and washers

Directions:

  1. Glue construction paper to a piece of cardboard, or just use the brown cardboard.
  2. Decorate CD case. Open case and place fun small items inside the case, glue items if needed. Close the case, set aside.
  3. Take construction paper or cardboard. Leaving space in the middle for the CD case. Glue on paper legs, arms, and head of robot.
  4. Glue on CD case to make the body of the robot.
  5. Decorate the robot's face with fun items.

Watch this project at: https://www.youtube.com/watch?v=N6vaRll6nJE

Pikes Peak Library District is pleased to announce the winners of the 2020 Jean Ciavonne Poetry Contest for Children:


Bricks of Wheat
By Cooper Alvin

As I come home from school, filled with resent,
I see cold cream of wheat, hard as cement!
I thought what could be built with such hard a material,
Build skyscrapers out of this rock-hard cold cereal.
A new way of building! Who would of thought evolution
Could lead to such a disgusting solution.

Cream of wheat bricks! Now that’s something new!
Guess the trick to construction is edible goo!
Someone says: “The tallest building is inside Dubai.”
“That’s nothing! Build it with soup!” I reply.
We’d build it high and we’d build it wide.
Why would we do it? ‘Cause nobody’s tried.

A cream of wheat pool? No, that’d be just gross.
A cream of wheat coaster? (sigh) That’d be shunned on by most.
A cream of wheat car? Something no one would borrow.
Well, I’m out of ideas! Come back tomorrow!


Chocolate Peppermint Delight
By Emily Lunsford

One day during lunch,
My friend and I chatted.
She asked,
“If you could invent a dessert,
ANY dessert,
What would it be?”
We started sharing,
And worked together to imagine…
The Chocolate Peppermint Delight!

A chocolate lava cake,
But with peppermint bits in the lava!
Sweet, creamy vanilla ice cream,
With chocolate chip cookie crumbled in
On top of the cake.
A peppermint shell,
For the luscious ice cream.

Topping it off,
Caramel sauce,
And don’t forget
The flavorful peppermint sauce!
Whipped cream generously deposited
Around the plate,
And up the cake.

Coming out from our dream
Of heavenly desserts,
We smiled, thinking about
The luxurious treat.
Our mouths watering,
We looked down at our trays of cafeteria food.
And our otherwise fine tacos,
They didn’t seem nearly as good anymore.
Nor did our fruit cups,
Or our milk.
With the Chocolate Peppermint Delight on our minds,
Everything else faded in comparison,
To a dull gray.

It’s funny how a daydream,
A vision of succulent delicacies,
Can bleach perfectly fine food,
Leaving only the fantasy,
Bright and colorful.
That day I learned
That pure imagination
Can achromatize
Reality.


Bitter and Sour
By Azul Padilla

I’m grabbing a mango
Dancing like a weirdo
Cutting the mango
Nice and yellow
I ask my mother
Can you pass me the chili powder
I sprinkled it all over
Bitter and sour


How to Make a Pot of Rhino Stew
By Avery Pilkington

How to make a pot of rhino stew:
Add these five things to your Crockpot
Slice up some carrots
Chop up some potatoes
Dice up some worms
Add one huge RHINO
Add a dash of ground herbs
Put the lid on
Cook for SEVEN HOURS


The Life of a Cupcake
By Maya Rebugio

They put me in the oven to bake.
Me, a depressed and miserable cupcake.
Feeling the heat, I started to bubble.
Watching the others, I knew I was in trouble.

They opened the door and started my life.
Frosting me with a silver knife,
Decorating me with candy jewels.
The rest of my batch looked like fools.

Lifting me up, she took off my wrapper.
Feeling the breeze, I wanted to slap her.
Opening her mouth with shiny teeth inside,
This was the day this cupcake died.


I Love Pasta That’s No Doubt
By Madison Smith

Hear it boil from the pot
Crunch munchy from the box
I love pasta a whole whole lot

Short, fat, long, tall, just ask me I’ve got them all
Slippery, slimy, spaghetti
Whirly, twirly, colored noodles
Cheesy, wheezy, macaroni

Spiraled, curved, rigid, smooth, pasta makes me really groove
Pesto perfecto green and grand, even beefaroni from the can.

Rigatoni in my tummy
Amazing alfredo hot and yummy
With veggies or without
I love pasta that’s no doubt.

Supplies:

  • Shallow containers or plates
  • Cotton swabs
  • Dish soap
  • Liquid food coloring
  • Milk (whole milk is best but any percentage will work)

Directions:

  1. Pour the milk in a shallow container, just enough to cover the bottom. (Experiment with cold or room temperature milk.)
  2. Add drops of liquid food coloring to the milk, drop them close to one another in the center for a more dramatic effect.
  3. Dip a cotton swab in a small amount of dish soap and then very lightly touch it to the side of the color. Watch the liquid fireworks!

What is happening? Milk is mostly water but it also has proteins, minerals, and fat. The milk fat molecules are more dense than the liquid food coloring therefore the food coloring floats on top. The dish soap weakens the chemical bonds separating the water loving molecules and the water fearing parts of the molecules, flinging them apart and creating beautiful bursts of color. Keep experimenting, if the action slows down pour out the milk mixture into a spare container and start over with fresh milk.

Watch this project at: https://www.youtube.com/watch?v=Hh7iAMH59ZU&t=7s

Looking for a book you just can’t put down? These action-packed chapter books are great picks for kids ages 9 to 12.
Click on the link below to check out the booklist!

Supplies:

  • 2 clear containers, either plastic or glass, one large and one small. The small container should fit in the large container.
  • Water
  • One small weight or rock to place in the smaller container if it is too light
  • Food coloring
  • Long spoon or stick

Directions:

  1. Fill large container with cold water halfway.
  2. Fill the small container with hot water. (Need adult to help with hot water.)
  3. Add any color food coloring to hot water and stir.
  4. Place the small container, upright, into the large container of cold water.
  5. Observe what happens to the hot water. Hot water will float to the top because it's lighter than the denser cold water.
  6. Just like a volcano, hot lava rises up because it's lighter.

Watch this project at: https://www.youtube.com/watch?v=ujpr_NvUEkw

Supplies:

  • Papers of any kind; they can be construction papers, copy paper, or scrapbooking papers, and smaller scraps are fine.
  • Scissors
  • Pens or pencils for tracing and writing
  • A large, clean, clear glass jar like a Mason jar, pickle jar, or spaghetti sauce jar. Prepare your jar ahead of time by soaking off the label.

Optional supplies:
Buttons, pom-poms, ribbon, sequins, beads, stickers, or anything you happen to have on hand to decorate your jar, and some glue.

Directions:

  1. Cut out some hearts – at least a dozen. You can make a template for tracing or just cut them freehand. They should be able to fit inside the opening of your jar.
  2. On each heart, write a question that you would like to ask your family. They can be serious questions or silly questions. Here are some examples to get you started:
    • IF YOU COULD TRADE PLACES WITH ANYONE FOR ONE DAY, WHO WOULD IT BE?
    • WHAT IS SOMETHING THAT YOU THINK KIDS UNDERSTAND BUT ADULTS DO NOT?
    • WHAT IS THE STINKIEST THING YOU’VE EVER SMELLED?
    • WHAT IS THE HARDEST THING ABOUT BEING THE AGE YOU ARE NOW?
    • WHAT HAS BEEN THE HAPPIEST DAY OF YOUR LIFE SO FAR?
    • IF YOU COULD BE A CHARACTER IN A BOOK, WHO WOULD YOU BE?
    • DESCRIBE YOUR PERFECT COOKIE
    • WHAT IS SOMETHING EVERYONE LOOKS STUPID DOING?
    • WHAT KIND OF SECRET CLUB WOULD YOU LIKE TO START?
  3. Fill your jar with your “Conversation Hearts” and pick one at dinnertime every day. It’ a great way to get to know your family, to laugh, and to always have something interesting to talk about!
  4. If you want, decorate your jar with anything you happen to have on hand.

Watch this project at: https://www.youtube.com/watch?v=QCOBSA6lVuY

Supplies:

  • Crew sock (any size and color)
  • Stuffing, Fiberfill, or cotton balls
  • Markers
  • Scissors
  • Rubber bands or string
  • Ribbon (optional)

Directions:

  1. Fill your sock with stuffing from the toe up to the heel.
  2. Tie off your sock at the cuff, just above the stuffing.
  3. Tie off your sock again, somewhere above the middle of the sock, to make a bunny head.
  4. Cut the cuff of your sock into two flaps. You can do this by flattening out the cuff and cutting down the middle, making sure to get through both layers of sock. You should be left with two rectangle flaps.
  5. Round the flaps by cutting a half circle on each end, to make them look more like ears.
  6. Draw a face on your bunny with markers.
  7. Tie a ribbon around the bunny’s neck.
  8. You can add more decoration to your bunny with anything else you have at home.

Watch this project at: https://www.youtube.com/watch?v=_DWILFAswxY&list=PLMEg2Dd0dSFctLfDQxsL5…

Supplies:

  • Large jar (24 oz. spaghetti sauce jar or a large mason jar)
  • Water - 2 1/2 cups water (or until it reaches 3/4 of the way up the jar)
  • Oil - 1/2 cup
  • Sprinkle in as much salt as necessary but you'd need about 1/4 cup total
  • Food coloring (optional)

Directions:

  1. Pour water 3/4 to the top of a mason jar. Stir in optional food coloring.
  2. Pour oil into jar. Allow water and oil to separate.
  3. Sprinkle salt into jar. Watch the reaction occur and make observations.

Watch this project at: https://www.youtube.com/watch?v=v3qhs9SW-RA
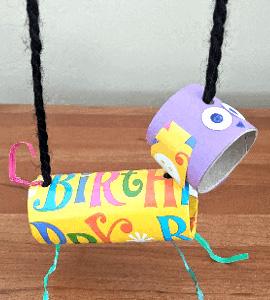
Supplies:

  • Paper towel cardboard tube
  • Stapler
  • Scissors
  • Glue
  • Pieces of cardboard
  • 2-3 bamboo skewers
  • Recycled materials and craft materials - can tabs, bottle caps, pipe cleaners, paper clips, etc.
  • Stickers- optional
  • Paint and paintbrush - optional
  • Markers - optional

Directions:

  1. Press down on one end of the paper towel tube and staple two times, closing up that end.
  2. Cut a small v-shaped notch in the middle of the closed end of the tube, between the staples.
  3. Decorate tube with paint, stickers, or markers.
  4. Cut out pieces of corrugated cardboard. One rectangle about 6" x 4" and smaller rectangles and triangles. Paint or decorate.
  5. Glue the open end of the cardboard tube onto the middle of the 6" x 4" rectangle piece of cardboard. Let dry 1-2 hours.
  6. After you've decorated the cardboard pieces, take a bamboo skewer and carefully thread the pointed end of the skewer through the wavy corrugated spaces inside the cardboard until the skewer comes out the other side.
  7. Do the same with another shape of cardboard on the other end of the skewer. Try balancing these two pieces by placing the skewer into the notch you created on the closed end of your cardboard tube.

  8. Add various other pieces of recycled materials to each side of your balance art. See if you can still make it balance. Find the center of gravity, which is the point where where all the weight of your art piece is centered so balance can occur.
  9. Decorate the base with caps or other recycled pieces.

Watch this project at: https://www.youtube.com/watch?v=d_spLdHMzeg

Supplies:

  • Plain white paper - 1 sheet
  • Construction paper - 1 sheet any color
  • Scissors
  • Glue (or tape)
  • Markers
  • Paper clips - 2
  • Stickers (optional)

Directions:

  1. Fold construction paper in half and place a paper clip on the top and the bottom of the folded paper to hold paper in place.
  2. Lay your hand down onto the paper, and trace around your fingers with a marker or pencil.
  3. Cut out your traced hand out, and try to cut just inside the tracing line as you cut. You may want to move the paper clips to secure the hand shape as you cut. You'll be cutting through two pieces of paper since your paper is folded in half.
  4. Take one hand for the front of the card and write something like, "Mom, I love you".
  5. With the white piece of paper, cut a strip off the long side about 2" wide. Fold the strip accordion style. (Fold a bit at one end and flip over and fold again, do this about 10 times.)
  6. On the accordion folded paper, write "THIS MUCH!".
  7. Glue each end of the accordion folded paper onto the back side of each hand piece.
  8. Decorate the front of your card with stickers or designs. Write your name on the back of your card.

Watch this project at: https://www.youtube.com/watch?v=gF6TujsXzzc&list=PLMEg2Dd0dSFctLfDQxsL5…

Supplies:

  • Packing tape (or clear contact paper)
  • Scissors
  • Masking or painter's tape
  • Markers or something to write with
  • Paper
  • A postage stamp
  • Decoration options: old greeting cards, confetti, easter grass, buttons, glitter, hole punches, pictures cute out of old magazines, newspaper or book pages, beads, stickers, yarn, any small, mostly flat craft materials you happen to have

Directions:

  1. Lay out three strips of packing tape face up. Carefully overlap the pieces to create a sticky sheet.
  2. Use masking tape to attach your packing tape sheet to the table so you have a good work area.
  3. Cut a piece of paper and on one side write the name and address of the recipient, on the other write a note or draw a picture.
  4. Decorate!
  5. Add your stamp to the upper left hand corner.
  6. Use three more pieces of packing tape to cover your entire work area.
  7. Peel your postcard off the table and trim off the masking tape, cutting your postcard into the shape you want.
  8. Drop it in the mailbox and send it to your loved one!

Watch this project at: https://www.youtube.com/watch?v=qHJFlwzeHkU&t=13s

Supplies:

  • Uncooked eggs
  • Clear drinking glass or plastic cup
  • Distilled white vinegar
  • Food Coloring
  • Spoon
  • Bowl of water
  • Tray to hold your experiment (optional)

Directions:

  1. Carefully place an uncooked egg in a clear glass or plastic cup.
  2. Pour enough vinegar into the cup to completely cover the egg.
  3. Add some generous drops of food coloring and stir gently. If you want a rainbow of colors, prepare a few more cups.
  4. Now it’s time to WAIT! Observe your eggs each day. The vinegar will slowly dissolve the eggshell over 2-3 days. You’ll see the liquid bubbling as this happens.
  5. After 3-5 days, remove the eggs from the vinegar, and place them in a bowl of water. Gently rub away any remaining bubbly shell residue to reveal the membrane that lies just below it.
  6. You can gently bounce your eggs! The eggs will be rubbery and bouncy but they are still raw on the inside. Bounce and press it to test just how rubbery it is … and beware, it may break! If it does, you can see what it looks like inside.

Watch this project at : https://youtu.be/CO9ay4euXVg

Parents and Educators! Do you know what resources are available to you on PPLD Kids? Go to this link to do the scavenger hunt: https://docs.google.com/forms/d/e/1FAIpQLScSIwSqDMcJFisY9TsiEO47000SMFs…

Supplies:

  • Scissors
  • Glue
  • Pencil (optional)
  • Button or foil (used gum wrapper works well)
  • Six different colors of construction paper or different color paper ads

Directions:

  1. Pick a color of paper and cut a small circle (about 2" diameter). You may also draw a circle first with your pencil and then cut it out.
  2. Take the first circle and place it on another color. Holding the first circle, or glue it down with a small dab of glue, cut around the first circle, just a bit bigger (1/2" bigger for example). Repeat this process using four more different colors.
  3. Before you fully glue your circles together, decide whether you want to cut fringe around the circle by cutting small slits around the circle's edge.
  4. Arrange your circles on top of each other, small to large. Finish your flower by gluing a button to the middle of the flower or even a recycled foil (gum wrapper) circle.
  5. For the stem, cut a thin strip of green construction paper or recycled greenish paper. Cut a leaf or two and glue to the stem.

Watch this project at: https://www.youtube.com/watch?v=0aNRHsAWI0U&list=PLMEg2Dd0dSFctLfDQxsL5…

Supplies:

  • Epsom salt
  • Hot water
  • Jar
  • Measuring cup
  • Food coloring (optional)
  • Spoon
  • Bowl or cup for mixing
  • Sand or small pebbles

Directions:

  1. You will need equal parts salt and water, you can decide how much based on the size of your jar. Measure out the salt and add it to your jar.
  2. Measure out the same amount of water and add to your mixing bowl or cup. If you are adding food coloring, put a few drops in the water and mix with your spoon.
  3. Pour colored water into jar with salt.
  4. Mix for 1-2 minutes.
  5. Add a tiny bit of sand or a pebble or two for the crystals to grow on.
  6. Put your jar in the fridge or, to jump start the process, put it in the freezer for 10 minutes before moving it into the fridge over night.
  7. Pour out the solution to reveal your crystals!

Watch this project at: https://youtu.be/e-OZVxuchkU

Presenting strategies for dealing with anxiety, tools for emotional awareness, themes of encouragement, hope, and love, these books, available in electronic formats, provide comfort during tough times.
Need help accessing electronic materials? Go to PPLD’s eLibrary to get started.
Click on link below to see booklist:

Supplies:

  • Paper towel, wrapping paper, or toilet paper roll
  • Paper to cover tube (optional) – Can use construction paper, brown bags, or wrapping paper
  • Markers and/or crayons
  • Elmer’s Glue or glue stick
  • Scissors (Adult supervision needed.)
  • Hole punch (You can use scissors if you don’t have a hole punch.)
  • Scotch tape
  • String, yarn, or ribbon
  • Pipe cleaners, popsicle sticks, pencils, or rulers for marionette handle
  • Miscellaneous items around the house (twist ties, buttons, etc.) to use for decorating

Directions:

  1. If you are using a paper towel roll, cut it in half.
  2. Take the half tube and cut it again about ¾ of the way down. The smaller part will be the head.
  3. Decorate the tube using paper, colors, paint, and/or stickers.
  4. Starting with the longer part of the tube, have an adult cut or punch holes on one side for legs. Cut/punch holes for the number of legs your creature will have. It can have as many or as few legs as you want.
  5. Make legs for your creature, using items around your house (twist ties, pipe cleaners, yarn, etc.). Once the legs are inserted in the holes, tape them in place.
  6. Create the head (small piece of paper towel tube). Add whatever details you want.
  7. Now you are ready to connect the head to the body. Punch or cut two holes on the opposite side of the legs. Then punch or cut two holes on the small tube – one on top and one directly underneath it.
  8. Cut 2 pieces of yarn, string, or ribbon the same length – at least 18 inches. Tie one piece of yarn to the front and one to the back of the long tube. Secure inside with a knot and tape.
  9. Take the yarn on the front side and slide the head on it. Make a knot inside the small tube to secure the head in place.
  10. To make the marionette cross bar, take to pencils (or rulers or craft sticks) and cross them to make an “X”. Tie the two pencils together using pipe cleaners, twist ties, or tape.
  11. Add the two strings attached to the puppet across from each other on one pencil. Secure with tape.
  12. Put on a play with your puppet and entertain your family!

Supplies:

  • Half a cardboard egg carton
  • Scrap pieces of newspaper or other paper
  • Tape: masking tape, or painter's tape, or scotch tape
  • 7 rubber bands
  • Plastic spoon
  • Pompoms or cotton balls or mini marshmallows
  • Various clean containers

Directions:

  1. Stuff each section of the egg carton with balled up newspaper.
  2. Close the lid and secure with 2 rubber bands, placed around the body of the carton.
  3. Wrap 2 more rubber bands horizontally around the carton, just below where the lid closes.
  4. Tape a rubber band to the handle of the spoon by attaching a long piece of tape to one side of the handle and inserting a rubber band before attaching the tape to the back of the spoon.
  5. Tuck the handle of the spoon under the rubber bands that were attached horizontally around the carton. The scoop part of the spoon should be facing away from the egg carton.
  6. Stretch the rubber band that's attached to the spoon up and over the spoon and around the back of the carton.
  7. Wrap 2 more rubber bands around the body of the carton so there are 4 rubber bands around the carton helping to keep it closed.
  8. Place a cotton ball in the spoon and shoot!. Place clean containers where you can aim your cotton ball.

To watch the project, go to: https://www.youtube.com/watch?v=V4o4eC5E_Qs

Supplies:

  • Empty tissue box
  • White scrap paper
  • Markers
  • Glue
  • Old catalogues or magazines
  • Colorful paper (wrapping, scrap booking, or construction paper work well)

Directions:

  1. Decorate your tissue box with markers or colorful paper. Stickers can also be fun!
  2. Cut your white scrap paper into 2 or 3 inch squares to make little cards.
  3. Draw one person, place, or thing on one side of each card. Leave the other side blank. You can also choose to cut out images from old catalogs and magazines and glue them to the cards.
  4. Place all finished cards (once they are dry) inside your decorated box.
  5. To play, draw three cards from the box and use them to tell a story. Play with others by taking turns drawing a card from the box and adding to a group story.

Watch the project at: https://www.youtube.com/watch?v=vwflHOAeCSo

Supplies:

  • Ruler (12" or 18" or 36") or measuring tape
  • Yarn or string
  • Scissor
  • A stuffed animal or your pet

Directions:

  1. Measure, as best you can, your pet or stuffed animal and determine its length in inches.
  2. After you know how many inches, cut a piece of string or yarn the same length.
  3. Take this piece of string and measure items around your house. How many cats (or hamsters or dogs, etc.) long is your kitchen? Your table? Your bed?

Please leave a comment below, tell us what you used to measure items around your house.

You can watch this project at: https://www.youtube.com/watch?v=jCU1Ks8mBf0

Supplies:

  • 2/3 c. warm water
  • 2 T. dish soap
  • Food coloring - 4 drops of any color you want
  • Bowl and whisk or a mixer
  • Paper towel or paper

Directions:
Place ingredients in a bowl and whip for 2 minutes. Make another batch of a different color. (Blue + Red = Purple, or Red + Yellow= Orange, or Blue + Yellow= Green) Take your paper towel or paper and lay over the colorful play foam in the bowl. Make some art! You can also make a couple batches to take into the bathtub.

You can watch this project at: https://www.youtube.com/watch?v=P7mHotWXvpg

Looking for a chapter book to listen to or read aloud with the family? Check out this selection of engaging chapter books in a variety of genres all available in electronic formats. Need help accessing these materials? Go to PPLD’s eLibrary to get started. Click on the pdf below to see the booklist.

Supplies:

  • One piece of paper
  • 2 additional smaller pieces of paper to keep score
  • Marker pen
  • 2 pencils
  • 36 water bottle caps, marked with two different colors, one color on top, the other color on the bottom (Coins work well because they have two different sides already, heads and tails).

Directions:

  1. Draw a grid on the paper with the marker pen. Draw 6 spaces by 6 spaces for a total of 36 spaces on your paper.
  2. Put your names at the top of each of the smaller pieces of paper.
  3. To play:
    1. Put two of each players' markers onto the middle four squares of the grid. (We'll call the markers pink and green.)
    2. The first player adds a green marker to the board, placing it beside a pink marker that it has now "trapped" between two green markers. Flip the "trapped" pink marker to the green side. Score one point for each of your opponent's pieces that you are able to trap and flip each turn. The next player adds a pink marker to the board in the same way, "trapping" a green piece and flipping it to the pink side and scoring one for flipping one piece.
    3. Take turns and be sure to notice possible ways to trap your opponent's pieces either vertically, horizontally, or diagonally. As you get better at the game, you'll be able to trap multiple pieces in different directions. If you cannot find an opponent's piece to trap, you have to skip your turn.
  4. To score, either count up each player's points or count how many of each players' markers show when the grid is full.

You can watch this project at: You can watch this project at: https://www.youtube.com/watch?v=kz38AUe91iQ

Supplies:

  • 10 water bottle caps (or any caps)
  • Elmer's glue
  • Yarn cut into 4 strands about 5" long
  • Square of cardboard cut from a cereal box
  • Stickers, optional

Directions:

  1. Cut a square size piece of cardboard.
  2. With glue, make two thin lines of glue vertically, and again, horizontally, keep the lines evenly spaced (see photo).
  3. Place one yarn strand on each glue line. Let dry. Trim yarn hanging off the edge of the cardboard.
  4. Mark five water bottle caps one way, and five caps another way. (Color the caps or attach the same sticker to five caps and a different sticker to the other five caps.)
  5. You are ready to play Tic-Tac-Toe!
  6. You can watch this project at: https://www.youtube.com/watch?v=kz38AUe91iQ

Supplies:

  • Any citrus fruit like a lemon, lime, or orange
  • knife with a parent or caregiver nearby
  • large tray or cookie sheet
  • baking soda
  • vinegar
  • lemon juice
  • dish soap
  • spoon or coffee stirrer
  • food coloring (optional)

Directions:

  1. Cut the tip off the fruit and then cut in half. Place on tray, sitting upright.
  2. Poke fruit with spoon or coffee stirrer to get juices flowing.
  3. Pour a little dish soap onto the fruit.
  4. Sprinkle baking soda onto the fruit.
  5. Squeeze drops of food coloring onto the fruit.
  6. Speed up the base/acid chemical reaction by adding drops of vinegar also!

You can watch this project at: https://www.youtube.com/watch?v=MCL7lOrY5-s