

Categories

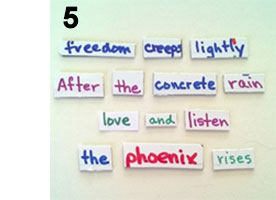
Create your own work of art using the stickers and frame.
Before your child can learn to write, they must develop the small/fine motor skills which are used to grip a crayon/pencil. Peeling the back off the stickers and placing them in the frame provides your child with the opportunity to develop these skills.
To prepare young children for writing, provide them with opportunities to use their hands and fingers. This will help them later when they hold crayons and pencils.
- Open and close containers with lids
- Cut with child-safe scissors
- Finger paint with paint, shaving cream, yogurt, or pudding
- Use a paintbrush
- Play with play dough and clay—roll, smoosh, pat, pound, and use tools like popsicle sticks or stamps
- Lace Cheerios onto pipe cleaners
- Lace pipe cleaners into the holds on a colander
- Draw, scribble, or write with crayons, pencils, and markers
- Put together puzzles
- Build with small blocks

Supplies:
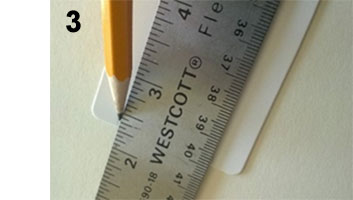
- Ruler (12" or 18" or 36") or measuring tape
- Yarn or string
- Scissor
- A stuffed animal or your pet
Directions:
- Measure, as best you can, your pet or stuffed animal and determine its length in inches.
- After you know how many inches, cut a piece of string or yarn the same length.
- Take this piece of string and measure items around your house. How many cats (or hamsters or dogs, etc.) long is your kitchen? Your table? Your bed?
Please leave a comment below, tell us what you used to measure items around your house.
You can watch this project at: https://www.youtube.com/watch?v=jCU1Ks8mBf0

Supplies:
- One small block of dry ice (about 1 lb.) broken into large pieces. (Do not touch dry ice with bare skin, it will burn!)
- Large bowl on a tray
- Table covering
- Warm water
- Dish soap
- Food Coloring
- Paper (any kind)
Directions:
- Pour warm water into the bowl.
- Add 2-3 squirts of dish soap (it may help to stir the solution gently at this point although I didn't).
- Add a chunk of dry ice using tongs or garden gloves.
- As bubbles rise up, add food coloring (2-4 colors).
- Lay paper over the colorful bubbles and press gently into bubbles. Add a different color and repeat with another piece of paper.
- Keep adding warm water and chunks of dry ice. Or start over with a fresh batch.
- Enjoy your wonderful bubble art!
Watch this project at: https://www.youtube.com/watch?v=852TC3_bSbU&list=PLMEg2Dd0dSFctLfDQxsL5…
Knowledge is power.
Unlock your potential!
The PowerPass is a just-for-students library card from PPLD, granting access to the Library’s digital resources like databases, eBooks, and song and movie downloads. Each PowerPass holder can also check out five physical items at a time from any of the 15 PPLD locations or Mobile Library Services.
PowerPass allows you
to access the power of:
- Live Online Tutoring
- Homework Help Guides
- Practice Tests & Prep Courses
- College & Career Planning
- Free Games, Music, & More
With Powerpass, you can also access fun activities such as games, movies, comics, and more!

Supplies:
- Barn and rooster shapes
- Four pipe cleaners (two pink)
- Googly eye stickers
- Green paper
- Shoe box or other small box (optional)
- Scissors or wire cutters
- Tape
Directions:
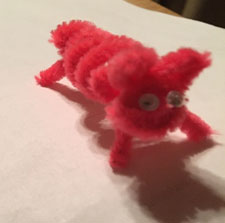
Pig:
- Take two pink pipe cleaners. Use caution as the ends of pipe cleaners can be sharp, especially once cut.
- Twist one pink pipe cleaner into a coil.
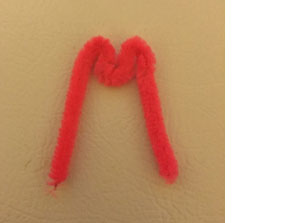
- Cut the second pipe cleaner in half. Take one half of the pipe cleaner and bend the middle into an “m” shape to make the ears. Twist the ears into one side of the pipe cleaner coil to make the ears.
- Cut the second half of the pipe cleaner in half again. Bend both halves into legs and twist into the body of the pig.
- Peel the tiny stickers off the back of the googly eyes and attach to the face of the pig.

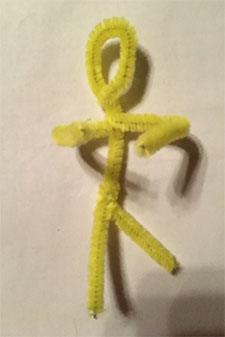
Farmer:
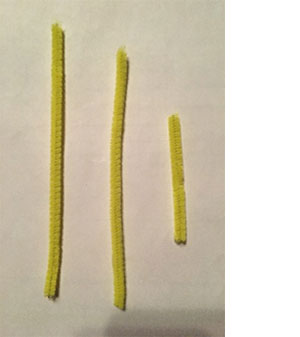
- Cut the two remaining pipe cleaners into three pieces – one that is 6 ½ inches, one that is 6 inches, and one that is 3 ½ inches.
- Take the longest piece and twist the top into a circle for the head.
- Take the second longest piece and twist around the base of the head as the arms.
- Use the shortest piece to make the legs. Just wrap and twist it around where the other leg would be.
- If you want, make a farmer’s hat out of paper and tape it to the figure’s head.
Assemble the Farm:
- If using a shoe box, arrange the farmer, the pig, the barn, and the rooster inside the shoebox. Cut a strip of the green paper about 1 ½ inches wide and 9 inches long. Fold a narrow strip over and glue or tape to the inside of the box. Use
scissors to cut the longer side of the paper into little strips to make grass. - If you don’t have a shoe box, use the sheet of green paper as the base for your diorama. Fold a 1-inch strip along the long end of the paper. Cut little strips into the paper to make the blades of grass. Use tape to attach the farmer, the pig, the barn, and the rooster to the green paper.
Want to show off your farm diorama? Post a photo on Facebook and tag @ppldteens or @ppldkids. Find more fun projects to try at https://ppld.org/kids/create/whats-new.
In honor of our annual cookie competition and as part of our anniversary, High Prairie Library is compiling an online cookbook: Harvest of Recipes - A Collection From the Falcon Community. We will be collecting YOUR recipes for our very own cookbook! Click here to submit your recipe and (optional) photo!

Take and Make kits for this project will be available at area PPLD libraries beginning Dec. 26, 2020
Materials Provided in Take and Make:
- Sandpaper
- Chalk
- Various papers
Materials Needed from home:
- Container of water
Directions:
Reading and writing go together! Writing begins with scribbles and other marks on paper. Encourage your child to “write” in various ways. In doing so, he’ll practice hand/eye coordination and develop hand muscles. Encourage your child to talk about what he is drawing. You can write captions for the drawings. As you do this, he’ll start building connections between written and spoken word.
See what he can create with these simple reading readiness activities:
- Draw with chalk on sandpaper
- Dip the chalk into a container of water to draw on the black construction paper
- Crumple a paper, flatten it again, and then draw on it to experiment with texture
- Draw on colored paper.
- Take the chalk outside and draw on the sidewalk. What can he create? How does the texture affect the drawing?
From Books to New Beginnings: Using the Library as a Resource to Build a Better Life
As one of the founders of Grey Wolf Resort, a health and wellness agritourism business in Victor, Colorado, award-winning chef and entrepreneur Nathan Dirnberger is just as likely to be found planning menus for gourmet picnics as chasing down a loose rooster.
But among these tasks, and the many others he tackles on a regular basis, there’s one more the Colorado native wraps into his days as well: reading.
“My mom's a librarian, so she always read to me as a kid, and I grew up reading,” says Dirnberger.
As he got older, he says, he went to school to become a chef. Years after graduating, Dirnberger wrote an article for the American Culinary Federation (ACF) on quantum physics and how it connects to a chef’s thoughts becoming a tangible experience. “If you give us a pile of ingredients,” he says, “we think about what we're going to create, and then we apply ourselves — that's the key right there — to turn it into a dish.”
In the ACF story, he says, he made the broader analogy of “encouraging people that they can make changes in their lives” if they apply that same theory.
About six years ago, Dirnberger started applying the theory to his own life outside of the kitchen, and “a big part of that,” he says, “was books.”
Dirnberger began to take advantage of all of the free resources his Pikes Peak Library District (PPLD) card could offer, from checking out print copies of books to downloading audio reads through OverDrive — which mom Cynthia Roberts, who has been a PPLD librarian now for almost three decades, introduced to him. Dirnberger was able to dig into and study popular titles by authors like Tim Ferriss, alongside other books about entrepreneurship, marketing, and business.
One in particular, stands out for him, though: David Schwartz’ classic The Magic of Thinking Big, first published in 1959, which Dirnberger listened to during a cross-country trip after finishing an internship on a farm. The book’s push to get people to dare to dream (and put concrete habits behind those dreams) spawned his concept for an agritourism-focused farm and ranch — what would become Grey Wolf Resort.
But books aren’t the only PPLD resources Dirnberger used.
“When I actually started creating my businesses, I would use the library too,” he says, reserving classrooms at Library 21c so he and his business partners could set up projectors and map out plans on whiteboards. “I pretty much started all my businesses there.”
“Tony Robbins talks about how there’s never a lack of resources. There’s a lack of resourcefulness,” Dirnberger says. The Library District is “a resource box,” he adds, “full of tools for people to change their lives … if they apply themselves.”
Currently billed as a “boutique, private, high-altitude health and wellness center” situated on a family farm and ranch, Dirnberger’s two-year-old Grey Wolf Resort offers guests everything from massages and guided mountain hikes to farm-to-table gourmet picnics. And Dirnberger still has lots of big dreams when it comes to the resort, ranging from building a commercial kitchen and a little restaurant on the property to setting an example for those interested in emulating the concept and creating more agritourism across the country.
With his passion for books, one might wonder if Dirnberger has another dream up his sleeve.
“Well, yeah,” he says, “actually, I’ve been writing one for a few years now, but as I started writing, I knew the story still had to be finished. … I needed to be able to do something that was actually worth telling. … I wanted a family. I wanted to be able to spend time with my family, that’s why I wanted to become a farmer, to spend time outside and be with nature, and help out with food and clean water and air, and all the things that people and animals both deserve.”
“Now that I’ve got all of that,” he says, “it’s a matter of starting to tell the story.”
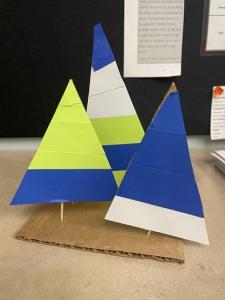
Supplies:
Cardboard triangles
paper strips
other decorations
toothpicks
cardboard rectangle or square stand
glue
scissors
Directions:
1. First, have a grown-up help with cutting cardboard (see supply list above.)
2. Glue paper strips to cover the cardboard triangle trees.
3. Trim excess.
4. Stick a toothpick into each cardboard tree as a trunk.
5. Stick your trees into the cardboard stand to make a winter scene.
Take and Makes for this project will be available at area PPLD Libraries beginning this Friday, Dec. 18, 2020
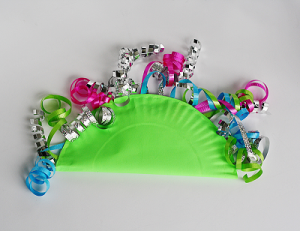
Supplies:
Provided in your Take and Make bag:
- paper plate
- ribbon
- beans
You will need to provide:
- glue/stapler/tape
- scissors
- markers
- more decorative materials (opt.)
Directions:
- Turn your plate upside down and decorate it however you like.
- Fold your plate in half so the art shows.
- Cut each ribbon into smaller pieces (not too small, around 2-3 per ribbon length; they shrink when they are curled!) and curl with scissors. You will now have some curly ribbons. You might need to ask a parent for help with this step.
- Tape your curled ribbons to the edge of one half of your paper plate.
- Put your beans in your folded plate and staple along the edges to keep it secure.
- Make some music! With your art, the curled ribbons, and the noisy beans, you have a colorful and creative music shaker!

Take and Make kits for this project will be available at area PPLD libraries beginning this Friday, Dec. 11, 2020.
Materials in Take and Make:
- Penguin copied on cardstock
- Pipette
- Printed penguins
- Sand
- Plastic egg
Materials from home:
- Crayons
- Water
- Cookie sheet
- Baking pan
- Ice cubes
- Tape
Penguin facts:
- Penguins can’t fly. They use their flippers to help them swim and to propel themselves as they glide on the ice.
- The torpedo shape of a penguin’s body helps it zip through the water at up to 25 mph.
- When it’s in the water, a penguin is usually searching for food. It can hold its breath for about 6 minutes.
- To move quickly across the ice, a penguin glides on its tummy.
- Penguins are warm-blooded. Like whales, they have a layer of blubber (fat) under their skin. Their bodies are covered with a layer of feathers that seal in the warmth.
- Penguins secrete oil from a gland that they rub over their bodies to make them water and windproof. They also huddle together to stay warm.
Experiment 1 – How do penguins stay dry?
Color the large penguin with crayons, pressing firmly. Use the pipette to drop water on it. See how the water rolls off the waxy coating. This works the same way with penguins when they rub oil over their bodies to make them waterproof.
Experiment 2 – How do penguins slide on the ice?
Tape a small penguin to an ice cube. Slide it down a slope. Add sand and see how it changes. Friction changes a penguin’s ability to glide quickly.
Activity – Egg transfer game
See if you can use your feet to transfer an egg to another person. This activity mimics the way that penguins transfer an egg from one parent to the other. Keep your egg safe while you do it!
For more information about penguins, look in the library’s non-fiction section (call number 598.47) or visit PPLD Kids Homework section.

What do subway graffiti, city as canvas, and an energetic dance party all have in common? Join us to explore colorful action figures inspired by pop artist Keith Haring and discover ways to create your unique masterpiece that will POP! Download the attached PDF templates and provide the additional supplies from home to get started. For ages 7 - 12.

Explore some spooky science activities and surprisingly strange science facts for ages 5 - 12.
Check out the video on our youtube channel here.
Download the attached document for activity instructions.

Watch this project at: https://youtu.be/VzCjt-OQf_s?list=PLMEg2Dd0dSFctLfDQxsL5SmuE8zkwQFmu
Supplies:
- Action figure template (in kit)
- Guided drawing sheet (in kit)
- Colored cardstock (half sheets) (in kit)
- White drawing paper (in kit)
- Bubble wrap (in kit)
- Packing peanuts (in kit)
You supply:
- Markers (colors and a black permanent)
- Tempera or acrylic paints (optional)
- Pencil
- Scissors
- Glue
Directions:
Drawing the Figures (Two Different Ways)
- Cut out your templates and use them to trace the figures onto colored cardstock. Cut out your colored cardstock figures. These are the figures you’ll use in your project.
- Or … use the guided drawing sheet to draw your own figures on the colored cardstock and cut them out. You can also draw from observation (looking at the figures) and your imagination! *You might want to start with pencil, but be sure to go over your outlines using a black marker that makes a bold line. Cut near the outside edge of the black line.
Create the Background (Three Ideas) The white drawing sheet is the background paper. You can use markers or paints to create the background.
- Draw a line across the paper, starting about a hand’s width from the bottom. Make it bold using a black marker. This is the foreground. You can use markers or paint to fill in the foreground and background (above the line) using two contrasting colors. You could also add a simple design in the foreground, like Keith Haring … black dash marks or a black line doodle design.
- Or … using a craft paint (tempera or acrylic), paint the sheet of bubble wrap. A primary color makes this Pop Art POP! Carefully lay the blank white sheet of drawing paper on top of the bubble wrap and gently “massage.” Be careful not to let the paper slide around. Carefully lift the paper off the bubble wrap and set aside to dry.
- Or … try making a black line “doodle” design that covers the solid white paper, another Keith Haring favorite.

Join Britt & Christa for this interactive program that will teach youth to build a holiday card of their choice in Scratch using block coding! This is a great introduction to coding for total beginners, or folks just starting to code. The program will require a password to log on, so please make sure to register and to provide the correct email address.
- When: Tue., Dec. 8 at 4 p.m.
- Where: Virtual - Click here to register.
Check out more coding videos!
Coming Soon: Raspberry Pi

Take and Makes for this project will be available at area PPLD Libraries beginning this Friday, Nov. 20, 2020.
Watch this project at: https://youtu.be/XkX6xyy3Ai8?list=PLMEg2Dd0dSFenhH3jVzKk-QmaHXdAFOBq
Supplies:
- Construction paper (in kit)
- Craft sticks (in kit)
- Ribbon (in kit)
- Scissors
- Markers
- Decorations
Directions:
- Decorate craft sticks with markers, glitter - anything!
- Cut the paper long, but slightly less wide than the craft sticks.
- Write a letter, secret note, or create art on one side of your paper.
- Glue a craft stick to the top and a craft stick to the bottom of the same side as your art. Let the glue dry.
- Roll the bottom craft stick up to the top like a scroll.
- Tie a ribbon around your scroll!


Check out the pdf link to see what young children like in books. Brought to you by the Colorado State Library.
In these unprecedented times, Pikes Peak Library District is a constant. This year, the need for PPLD’s resources has been greater than ever.
A couple months ago, I was visiting the Old Colorado City Library and met a man named Charlie. The building was still closed to the public at that time due to COVID-19 public health restrictions, but curbside service was available and Charlie was waiting to collect items he had checked out. We got to talking and Charlie told me he was there to check out a WIFI hotspot. Like so many others, Charlie lost his job during the pandemic and without internet he couldn’t apply for jobs. “I don’t have internet at home and everything is online these days. I don’t know what I’d do if I couldn’t get internet through the library.”
As the second largest library system in Colorado, PPLD operates 16 facilities and serves a population of more than 660,000 residents in El Paso County. In 2019, patrons made 3.1 million visits to the library and checked out nearly 8.3 million items. There were more than one million uses of our paid and locally developed databases. We received 50,000+ online meeting room requests and 250,000 people attended a library program.
 When COVID-19 hit El Paso County in March of this year the impact library closures had on our community was felt immediately. Hundreds of thousands of people who rely on the library for critical resources and services suddenly found PPLD’s doors closed. During the course of weeks and months following the library’s initial closure, PPLD quickly adapted to a new reality, and the accomplishments we have realized while successfully pivoting around a “new normal” have become a model for libraries throughout the country.
In response to the COVID-19 pandemic, PPLD expanded its remote and virtual offerings in a myriad of ways. Our librarians are bringing their services to you, anywhere and anytime. Library patrons can watch a virtual story time with their kids, participate in a virtual book club, or join us for a community movie discussion. Patrons can ask one of our reference librarians questions by phone, live chat, and email. For parents who have suddenly found themselves teachers, we have ample resources for children and teenagers, including homework help, reading help, planning for the future, and more. Patrons can stream and download eBooks, music, and videos from almost anywhere!
All 15 Libraries and three mobile Libraries continue to offer curbside service, making it easy for you to return materials and safely pick up items without having any direct contact with Library staff or other patrons. And, on July 1, Library facilities have re-opened to the public in accordance with public health and safety guidelines.
PPLD participated in several initiatives to address unique community challenges brought about by this pandemic. We have been a part of the statewide Make4Covid movement and worked with makers throughout our region to help in the production of personal protective equipment for the medical community, first responders, and those who need it most. PPLD staff installed public water stations at Penrose Library so any and all can fill containers whenever needed. Staff members also boxed up thousands of books and handed them out at free lunch distribution sites throughout Colorado Springs. So, when people came for a meal, they got a book, too.
 For nearly 60 years, Pikes Peak Library District has stood as a pillar of the community, and we will continue to serve the community in every way we can during this pandemic and beyond. But, none of this is possible without the public’s investment and donors like you. PPLD has felt the economic impacts of the pandemic, and we are now facing a budget shortfall of at least $500,000. Will you support PPLD, and people like Charlie, by donating today? Your charitable gift of $30, $50, $100 or $1,000* will help PPLD be stronger and more prepared to accommodate the changing times and the growing need for our many critical services.

This Science of Flight Take and Make STEM project will be available at area PPLD Libraries starting Nov. 13, 2020 and is intended for ages 5-12.
Watch these projects at: https://youtu.be/6W6ZtLCe1ow?list=PLMEg2Dd0dSFctLfDQxsL5SmuE8zkwQFmu
Materials provided in Take and Make:
- Plain paper
- Paper airplane template (also attached below)
- Rubber bands
- Whirly-gig or a Mars Helicopter, see https://www.jpl.nasa.gov/edu/learn/project/make-a-paper-mars-helicopter/
Materials you provide:
- Tape
- Hole punch (or something else to poke a hole)
- Scissors
The Science of Flight
Four forces of flight not only affect how an airplane flies, but also affect a paper airplane. These forces – lift, thrust, drag, and weight – determine how a plane will fly.
- Lift is the force that keeps the plane in the air. Lift works opposite the weight of the plane.
- Thrust is the force that propels the plane forward.
- Drag acts opposite to the direction of motion. This force is affected by friction and differences in air pressure.
- Weight is the force of gravity. The pull of an object toward the center of the earth.
In today’s Science of Flight activity, we’ll do several activities. Since paper airplanes are subject to the same forces as actual airplanes, think about the forces of flight and experiment to see what helps your plane fly straighter, more accurately, or farther.
Paper Airplanes:
Use the paper to create paper airplanes. See the pdf link below for the template. Which ones fly the farthest? Which has the best aim? How can you adapt them to change their flight? Test them out.
Paper Airplane catapult:
Start by using the template to create a paper airplane. Just fold on the numbers in order, always folding to the inside so you cover the number with the fold. Once your airplane is folded, punch or poke a hole through all layers about 2 inches from the nose of the plane. Push a rubber band through your hole and then put one end of the rubber band through the other and pull gently. Fly the airplane by hooking the rubber band to your thumb or finger, gently pulling back on the airplane, and then letting go of the plane. See how far it will go! Can you aim it?
Whirly-gig:
Take the whirly-gig in your Take and Make or go to the NASA link above to print out a Mars Helicopter template. On the end where the paper is divided in half, fold the halves in opposite directions. On the part that’s divided into thirds, fold the 2 outside parts in on the dotted lines and then fold the bottom up twice. Either toss the Whirly-gig straight up or drop it from a high place and watch it float down. Experiment with it.
July 31, 2021 marks the 150-year anniversary of the founding of Colorado Springs by William Jackson Palmer. The city, founded at the base of Pikes Peak, experienced many changes over the last 150 years as it has grown to the 39th largest city in the United States.
Sesquicentennial - noun ses·qui·cen·ten·ni·al | \ ˌse-skwi-sen-ˈte-nē-əl \ A 150th anniversary or its celebration.
Pikes Peak Library District (PPLD) and other community organizations are planning an extensive series of programming and events throughout the year. Many programs focus on providing a historic background to better understand our city today, both for people new to the community and for folks just starting to learn about the region’s history. Other programs are designed to critically examine and appraise the complexities of Colorado Springs’ past. The history of our city is important to all of us; there is something for everyone.
Check back for more programs and events as they are added.
Genealogy Basics (Colorado Edition) [Virtual]
Are you interested in researching your genealogy, but aren't sure where to start? Join us for an introduction to basic genealogy research strategies including getting started, organizing research, and selecting and searching for records. In celebration of Colorado Day, this month's Genealogy Basics classes will focus on researching your Colorado ancestors!
Knob Hill Street Art Walking Tours [In-Person]
The Knob Hill neighborhood is home to an extraordinary amount of street art. Tour the neighborhood and see the murals at the street level with the street artists who created the art. Learn about the community focused organization, Knob Hill Urban Art District, that creates the murals. Talk with the artists. Experience the art up close. Snake your way through the alleys of the district to find hidden gems. Don't forget your walking shoes!
Library Explorers: Colorado Springs History [Virtual]
Library Explorers programs are designed for adults of all abilities. Join us to learn more about Colorado Springs history using PPLD's Digital Collections. Bonus points if you can find the cat or dog in these historical photos!
Pikes Peak Regional History Symposium
Nice, Naughty, & Notable: Colorado Springs at 150 In a year marking the 150-year anniversary of the founding of Colorado Springs by William Jackson Palmer, Pikes Peak Library District is pleased to offer our 2021 Pikes Peak Regional History Symposium virtually! This year's program has been divided into four separate virtual events. We are excited to celebrate our city's sesquicentennial with you!
- Sat., May 22
- Kathy Sturdevant: “Instant Civilization”: The Engineer of “Progress” and the Magic Early Years of Colorado Springs
- Steve Plutt: The Lake George Ice & Power Company
- Doreen E. Martinez: Historicizing Indigenous Presence: Footprints, Artifacts, Ways of Being and Knowing
- Sat., June 26
- Susan Fletcher: Glen Eyrie at 150 (Give or Take Several Millennia)
- Tom Noel: The Broadmoor Hotel’s Beginnings: From Count James Pourtales to Spencer Penrose
- Eric Swab: Three Trails That Ring Cheyenne Mountain, Three Tales of Infidelity, Bribery, and Provocation
- Sat., July 24
- Leah Davis Witherow: CC Professor Edith Bramhall, teacher, mentor, city council member, & activist
- Eric Metzger: The McAllister House and its Place in 150 years of Colorado Springs History
- Greg Atkins: City Business: Colorado Springs and the Libertarian Party
- Sat., Aug. 28
- Rick Sturdevant: Air and Space Forces in Colorado Springs: Their Bases and Memorable Characters
- Mark James: Dr. James, Moral Reformer, Scientist, Pikes Peak
- Kathy Sturdevant: The Quaker Trail: Moral Infiltration, Disintegration, and Revival in the Pikes Peak Region
Previous Events
CoS History Book Club
The past is the window to the present. Using the published works of local historians as inspiration, this program will highlight specific themes of Colorado Springs and the region. It is offered in concert with the books referenced, which provide additional background. However, attendees should not feel obligated to read the books in advance of the discussion. The series will provide high-quality information about the community to a broad and diverse audience.
Previous Topics
April Topic: Invisible People Join editors Takiyah Jemison and Heather Jordan in a panel discussion of the newest release of the Pikes Peak Library District’s Regional History Series: an updated edition of The Invisible People of the Pikes Peak Region by John Stokes Holley. Originally published in 1990 by the Friends of the Pikes Peak Library District and the Friends of the Colorado Springs Pioneers Museum, this book presents a comprehensive history dedicated to the local African American community. The reprint includes the original publication in its entirety, along with new chapters, an index, and additional images. A copy of the book may be checked out from the Library (via our Catalog) or purchased from PPLD Special Collections (20 N. Cascade Avenue), the Colorado Springs Pioneers Museum (215 S. Tejon St.), or clausenbooks.com. A recommended chapter will be emailed to all registrants.
March Topic: Doctors, Disease & Dying Join Katie Rudolph, Denver Public Library archivist, and Matt Mayberry, director of the Colorado Springs Pioneers Museum, as they present on their chapters from our Regional History book series title, Doctors, Disease & Dying. Katie will outline the events leading up to and surrounding the 1918 influenza pandemic in Denver, mirroring her chapter, "The influenza pandemic of 1918 : a Colorado Springs timeline." Matt Mayberry will speak with us about the local tuberculosis industry in, "On a cough & a prayer : the Modern Woodmen Sanatorium & the tuberculosis industry in the Pikes Peak Region." For more information about the pioneers, traders, and military personnel who were both the purveyors and the recipients of needed care in the Pikes Peak Region, Doctors, Disease & Dying can be checked out from library locations.
January Topic: Visible People Downtown Colorado Springs contains visible monuments to multiple significant local historic figures. Regional History and Genealogy Director, Brett Lobello, will discuss how these monuments offer a window, not just into William Jackson Palmer, Winfield Scott Stratton, and Spencer Penrose, but also the people and community that chose to commemorate their life and actions. 150 years after the founding of Colorado Springs, historians are still learning from the words and deeds of General William Jackson Palmer. Leah Davis Witherow, Curator of History for the Colorado Springs Pioneers Museums will explore manuscripts, photographs, artifacts, and memories of those who knew him best – General Palmer is more valuable and relevant than ever. For more information about the history of Colorado Springs, Newport in the Rockies can be found in the catalog and checked out from library locations.
November Topic: Extraordinary Women Inspired by the Pikes Peak Library Districts’ Regional History Book Series book, Extraordinary Women of the Pikes Peak Region, the first program will introduce women important to Colorado Springs history. Chris Nicholl, PPLD Regional History and Genealogy staff member, will share the story of three Colorado Springs women whose political demonstrations at the gates of the White House landed them in prison and helped win the 19th Amendment to the U.S. Constitution, granting American women the right to vote. Susan Fletcher, Glen Eyrie Navigators Historian and Archivist, will explore the lives of Queen Palmer, wife of General William Jackson Palmer, and their three daughters, Elsie, Dorothy, and Marjory. For more information about women of the Pikes Peak Region, Extraordinary Women of the Pikes Peak Region highlights these stories as well as the stories of 18 other women. Susan Fletcher's chapter is published in Bigwigs & Benefactors of the Pikes Peak Region.
Streaming History: Fannie Mae Duncan To celebrate Black History Month, PPLD Special Collections will host a live chat while streaming the Rocky Mountain PBS documentary, Fannie Mae Duncan. While watching the documentary, you can chat with PPLD staff and the documentary's producer, Kate Perdoni. Meet the inspiring Fannie Mae Duncan, an African American nightclub owner who brought the motto “Everybody Welcome” to true meaning at her Colorado Springs Cotton Club despite the volatile Civil Rights Movement of her day. The granddaughter of slaves and the daughter of tenant farmers, Fannie Mae stood up against disharmony and heartbreak to maintain the first racially integrated club in the city. Premiered on Rocky Mountain PBS November 8, 2018.
Invisible People Book Release Join the Pikes Peak Library District and the Special Collections team for a virtual book release of The Invisible People of the Pikes Peak Region by John Stokes Holley. To help celebrate the book’s release, we will hear presentations from two Colorado Springs natives. PPLD Senior Adult Services Librarian Melissa Mitchell will present “Growing up with Greatness” and Colorado Springs native Sharon Tunson will present “Unsettled Settler.” Also speaking at the event will be PPLD Chief Librarian John Spears and the book’s editors, Takiyah Jemison and Heather Jordan of the Pikes Peak Library District. Registration is required for this zoom event.

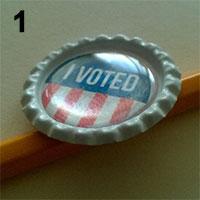
Take and Makes for these projects will be available at area PPLD Libraries starting Friday, Nov. 6, 2020. Supplies provided:
- Bottle cap
- “I Voted” sticker
- Blank sticker
- Epoxy sticker
- Circle or square magnet
- Blank business card
- Rectangular magnet
Supplies needed (from home):
- Markers or colored pencils
Watch the “how to” video on PPLD TV: https://youtu.be/GPgX1oKgfNE?list=PLMEg2Dd0dSFctLfDQxsL5SmuE8zkwQFmu
Bottle Cap Magnets:
- Choose if you want to use the “I Voted” sticker or design your own. If you would like to design your own sticker, do so on the blank white sticker (not the clear, thick sticker).
- Peel off one sticker and stick to the inside of the bottle cap.
- Peel off the epoxy sticker (the clear, thick sticker) and place on top of the first sticker inside of the bottle cap. Press down to make sure it is stuck tight.(Avoid touching the back of the sticker as it will leave fingerprints.)
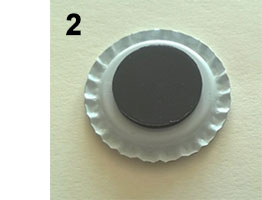
- Peel the adhesive backing off the small round or square magnet. Stick the magnet to the back of the bottle cap.
Fridge Magnets
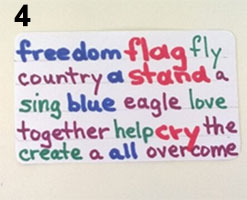
- Decorate the blank business card. You can design it however you want. Some ideas include drawing a mini poster for your favorite fictional character or writing out words on the business card to make magnetic poetry.
- If you decide to make magnetic poetry, start by drawing 4 light pencil lines on your business card. Then write out election day themed words with colored markers. Be sure to include some articles (a,an,the), some descriptive words, overreactions, and some nouns (like people, animals, places, or things). Your imagination is the limit! (Only decorate one side of the business card).
- Peel off the back of the rectangular magnet and stick it to the back of the decorated business card. You now have a fridge magnet! If you decided to create magnetic poetry, use a pair of scissors to cut out each individual word,then arrange them into funny or meaningful poetry phrases.
Want to share your creations? Tag us on Facebook @ppldteens or @ppldkids.

Pikes Peak Library District (PPLD) reached a record-breaking milestone this week, with two million digital book checkouts. This accomplishment illustrates the continued growth and importance of library digital lending of eBooks and eAudiobooks, especially in a year with building closures due to the global pandemic. PPLD is one of only 40 OverDrive digital collections worldwide to hit the two-million mark at this point in 2020.
PPLD has been providing cardholders with 24/7 access to eBooks and eAudiobooks for several years through OverDrive and its award-winning Libby reading app. Reader interest and usage has grown every year, with about a 42% increase since 2016. In the wake of COVID-19, PPLD took extra steps to make the collection as accessible as possible like extending the length of online library card signups and reinstating expired cards from the 24 months prior to March 2020.
The milestone checkout was Cold as Ice: Lucy Kincaid Series, Book 17 by Allison Brennan and Ann Marie Lee on the evening of Oct. 27, 2020. At this point in 2020, PPLD’s highest-circulating digital title has been Where the Crawdads Sing by Delia Owens, checked out as an eBook or eAudiobook over 6,000 times. The top-circulating genres through OverDrive include fiction with more than one million circulations, nonfiction at nearly 460,000 checkouts, and romance at nearly 415,000 circulations.
Here are the top five titles borrowed through PPLD’s digital collection as of Oct. 29, 2020:
- Where the Crawdads Sing by Delia Owens
- The Guardians by John Grisham
- Educated by Tara Westover
- White Fragility by Robin DiAngelo
- Blue Moon by Lee Child
- Harry Potter and the Sorcerer's Stone by JK Rowling
- Where the Crawdads Sing by Delia Owens
- White Fragility by Robin DiAngelo
- Talking to Strangers by Malcolm Gladwell
- Becoming by Michelle Obama
Residents in El Paso County only need a valid library card to access digital books from PPLD’s OverDrive-powered digital collection. Readers can use any major device, including Apple(R), Android™, Chromebook™ and Kindle(R) (US only).
Check out our eLibrary or download the Libby app to start borrowing eBooks and eAudiobooks anytime, anywhere!
TAKE AND MAKE: Tween Twist: Dragon Eggs
Pick up your Take and Make supplies at area PPLD libraries starting Friday, Oct. 9, 2020
Supplies:
- Styrofoam egg
- Box of thumbtacks
- Glue
- Toothpick
Optional supplies:
- Sharpie markers, nail polish, or rhinestones
Watch the “how to” video on PPLD TV https://youtu.be/YyPNAoIxy3w
Directions:
- Start the dragon egg at the very bottom of the Styrofoam egg. You can glue this “starter” tack in for stability.
- Insert tacks into the egg so that they overlap the “starter” tack and each other. The tacks overlap like fish scales.
- Keep adding tacks, overlapping them as you move up the egg and cover it with tacks.
- You will put a final tack at the very top. You can also glue this tack to help it stay in.
- You can add glue to any tacks that feel loose or like they might fall out. Use a toothpick to push the glue in where it needs to go.
- If desired, you can use colored sharpies, nail polish, and/or rhinestones to further decorate your egg.
Submit a recipe to Pikes Peak Library District's A Harvest of Recipes digital cookbook! Use this link to upload your recipe: https://ppld.librariesshare.com/ppldrecipes/
Some Fun Facts about Grilled Cheese
❖ Though similar recipes were mentioned in ancient Roman texts, the grilled cheese sandwich was technically invented in France in 1910, known as the Croque Monsieur.
❖ However, most experts agree that the first grilled cheese sandwiches were made in the United States in the 1920s when Otto Frederick Rohwedder invented a bread slicer that made distributing white bread easy and affordable.
❖ Shortly before that, processed cheese has been patented by James L. Kraft, whose pasteurizing process ensured that cheese would not spoil, even when transported great distances (the first Kraft plant opened in Illinois in 1914).
❖ During WWII, Navy Cooks prepared open faced grilled cheese sandwiches on Navy ships as instructed by government issued cookbooks. These sandwiches were called “American Cheese Filling Sandwiches.”
❖ In 1949, people finally began to add the second slice of bread to the top of this sandwich to make it more filling, and the sandwich we all know and love was born.
❖ The name “grilled cheese” wasn’t used until the 1960s; before then it was called “toasted cheese” or “melted cheese” sandwiches.
❖ Approximately 3/4 of people who buy sliced cheese make at least one grilled cheese sandwich per month.
❖ National Grilled Cheese Day is celebrated on April 12th!
Recipes:
Please use adult help with slicing or heating!
- Allison’s Grilled Cheese Sandwich Ingredients: Bread Butter Cheese slices (thin) Optional (onion, apple, kale) Stone ground mustard --experiment with your own ingredients— Instructions: Butter bread slices on one side, flip slices over and add mustard to insides of bread. Stack up ingredients between bread slices. Place in heated frying pan (low to medium heat); cover with lid. Cook on low to med. heat until bread is toasty and golden on one side; flip over until done. Cheese should be melted.
- Betty’s Gluten and Dairy Free Grilled Cheese Sandwich Ingredients: Gluten-free bread Vegan butter spread Sliced vegan “cheese” Avocado (optional) Mustard Instructions: Butter bread slices on one side, flip slices over and add sliced cheese. Scoop out avocado and spread (if desired); add mustard to top slice. Place in heated frying pan (low to medium heat); cover with lid. Cook on low to med. heat until bread is toasty and golden on one side; flip over until done. Adjust heat as needed. Cheese should be melted.
- Brady’s Grilled Cheese Ingredients: Whole wheat bread (or bread of your choice) Butter Garlic clove (broken open) Mayonnaise Cheese slices (American, grated cheddar, or your choice) Instructions: Cover all sides of bread with mayonnaise. Heat non-stick electric griddle; carefully rub with butter and clove of garlic. Place one slice of bread on hot pan. Add cheese; top with other slice of bread. Cook until bread is toasty and golden on one side; flip over until done. Cheese should be melted.
- Amanda’s Easy Creamy Microwave Tomato Soup in a Mug Ingredients: 7 oz. diced tomatoes ½ tbsp. tomato paste ½ cup broth 1/8 cup light cream Optional (to taste): sweet yellow onion, basil, pesto, salt and pepper Supplies: Mug Blender Microwave Instructions: Add all ingredients together in blender. Blend until smooth. Transfer soup into a microwave safe mug. Microwave for one minute. Let cool and enjoy!
- Athena’s Cake in a Mug Recipe Ingredients: 1/4 cup flour 2 tbs. sugar 1/2 tsp. baking powder A pinch of salt 1/4 cup milk 1 tbs. oil 1/2 tsp vanilla extract Instructions: Pour the dry ingredients into your mug and mix. Add the wet ingredients, and then mix until there are no large clumps or dry flour at the bottom of the mug. Microwave for 90 seconds. (You may need to adjust this 10 seconds in either direction, based on your microwave's power.) Be careful pulling the hot mug out of the microwave! At this point, you could add some icing or a scoop of ice cream, or eat your cake plain. Enjoy!
Citations and Resources: “Kids Vs. Science: Making The Greatest Grilled Cheese;” Mental Floss video; https://youtube.com/watch?v=tAN6vC7-YeA “How chemistry creates the perfect, gooey grilled cheese sandwich;” PBS News Hour; http://pbs.org/newshour/science/grilled-cheese-chemistry-forever “What a cheesy sandwich looks like in 15 places around the world;” Insider; http://insider.com/grilled-cheese-around-the-world-2018-10 “History of the Grilled Cheese Sandwich;” Daily Dish Magazine; http://foodiefriendsfridaydailydish.com/national-grilled-cheese-month-h… “The History of the Grilled Cheese;” The Committed Pig blog; http://www.thecommittedpig.com/the-history-of-the-grilled-cheese-and-ho… “The History of the Grilled Cheese Sandwich;” http://HowStuffWorks.com; http://www.recipes.howstuffworks.com/history-of-grilled-cheese.htm

Supplies:
In Take and Make kit (pick up a kit starting 9/11/20 at any PPLD Library, while supplies last)
- UV beads
- Pipe cleaner
- Paper plate
- Pencil
- Black construction paper
- Template pdf below
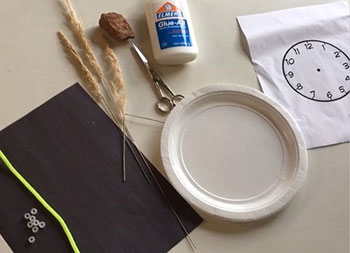
You supply:
- Glue
- Scissors
- Clock face template (pdf to print below)
- Natural objects from outside: rocks, weeds, flowers, leaves, etc.
Directions:
- UV beads illustrate some of the harmful effects of the sun and therefore, why we use sunscreen. UV light is one type of light from the sun. We can’t see it, but insects and birds can. While this UV light can help our bodies produce Vitamin D, too much of it can also cause sunburn or skin damage. Take the UV beads in your kit and string them on a pipe cleaner to make a bracelet. Go outside to watch them react to the UV rays – even on a cloudy day. You might also want to experiment with sunscreen, sunglasses, or windows and see what happens!
- You can also use the power of the sun, construction paper, and natural objects to create a work of art. Take your piece of paper and place it in a sunny place. You may need to weight it down. Place natural objects on the paper and leave it all in the sun for several hours. The UV rays of the sun help break down the dye in the paper creating your design. We found that we had to tape down some of the objects so they didn’t blow away. If you use tape, be careful that it doesn’t show.
- Next, you can make a sundial clock. Decorate the plate if you’d like. Cut out and glue the clock face to the back side of the plate. Poke the pencil through the center of the plate and take it outside. You’ll need to place the clock with the “12” facing north to determine the correct time. Watch how your clock tells time during the day.
- Watch these solar projects at: https://youtu.be/fHE8QoUau5U?list=PLMEg2Dd0dSFctLfDQxsL5SmuE8zkwQFmu
These activities are based on:
http://solar-center.stanford.edu/activities/UVBeads/UV-Bead-Instruction…
https://www.scholastic.com/parents/school-success/learning-toolkit-blog…
https://www.raisingarizonakids.com/2015/06/how-to-make-sundial-clock/