

Categories

TAKE AND MAKE: Water Balloon Parachute
Can your water balloons survive a big drop? Find out with this experiment.
Pick up your Take and Make kit at PPLD Libraries starting September 4, 2020
Supplies:
- One balloon
- Water
- One plastic shopping bag
- One rubber band
Directions:
- Add water to your balloon, don't fill the balloon, leave lots of room to tie the balloon closed.
- Cut the ends of the handles of the bags. Tie or rubber band them to the knotted end of a water balloon.
- Go outside and drop it from a high place to see if it breaks when it lands.
- Test and retest until your balloon breaks.
- Try it again with another balloon.
See what else you can attach to your parachute and let drop.
 There are nearly 3,000 special districts in the state of Colorado, including library districts, park districts, water districts, fire districts, and many others. Every year, one district from those thousands is chosen by the Special District Association of Colorado to receive its highest honor, the J. Evan Goulding District of the Year Award. We are excited to announce that the SDA has chosen Pikes Peak Library District as this year's recipient!
The J. Evan Goulding District of the Year Award was established by the SDA Board of Directors to single out a district that demonstrates exceptional leadership and community spirit. This award recognizes a district's major accomplishments, series of outstanding efforts, and a steady determination to serve its constituency. This year's winner, Pikes Peak Library District, truly exemplifies these qualities.
The history of public libraries in the Pikes Peak Region began in October 1885 when the Colorado Springs Social Union established a library in downtown Colorado Springs. In 1905, a new library opened with funds donated by Andrew Carnegie and land granted by General William Jackson Palmer. In 1962, a majority of El Paso County citizens voted to establish a special taxing district, and Pikes Peak Library District (PPLD) was formed. After not joining the District initially in 1962, the town of Manitou Springs subsequently voted to join PPLD at the beginning of 2013.
As the second largest library system in Colorado, PPLD serves a population of more than 660,000 residents in El Paso
County, with the exception of Security/Widefield School District #3. This includes all unincorporated areas and municipalities of Calhan, Colorado Springs, Ellicott, Falcon, Fountain, Manitou Springs, Monument, and Palmer Lake. The District is able to serve such a large number of citizens thanks to an employee base of nearly 475 full-and part-time staff and almost 1,700 volunteers. PPLD’s Board of Trustees consists of seven members from the community. The citizen volunteers are appointed jointly by the Colorado Springs City Council and El Paso County Commissioners for a maximum of two five-year terms.
The District currently operates 16 facilities throughout the county. In addition to the large collections of physical and digital materials that are available, a number of sites also feature state-of-the art services, such as makerspaces and studios. PPLD’s makerspaces offer access to tools, materials, and machines to help bring patrons’ creative visions to life. Equipment such as 3D printers; laser engraving and cutting machines; and assorted handicraft and art tools are all available for use. In the District’s studios, Library cardholders have access to items such as cameras, audio mixers, and even a green screen to produce professional-grade recordings. Moreover, the District operates a three-vehicle mobile fleet that delivers Library services to more rural and remote areas as well as to communities for individuals who have limited mobility.
The District has also established a number of strategic partnerships to help serve their local community. For example, the new Pikes Peak Culture Pass program allows patrons to explore museums and attractions in the Pikes Peak region at no cost. By collaborating with local organizations, PPLD provides free admission passes for check out, increasing opportunities for education and cultural learning. In addition, the District has expanded its adult learning programs in recent years. Career Online High School is an online high school diploma and career certification program provided by PPLD. Students can choose a major from a list of high-growth, high-demand career fields and complete coursework to develop the skills and knowledge that employers are looking for. The District also offers English as a Second Language classes and food industry training.
In 2018, in partnership with The Place (formerly Urban Peak Colorado Springs), the District launched a first-of-its-kind initiative in Colorado aimed at helping teen runaways and youth experiencing homelessness. The partnership resulted in PPLD locations becoming a part of the National Safe Place Network. As a part of this network, an at-risk youth can enter the library and ask for help. From there, the library staff can contact The Place who will then arrive and begin to find the appropriate assistance.
During the ongoing COVID-19 pandemic, the District transformed its library services to expand access beyond the traditional use of libraries. PPLD launched a number of virtual programs and began offering curbside services. When the pandemic first began and there was concern over a shortage of personal protective equipment (PPE), the District became involved with a group called Make4COVID, whose wide network of members worked together to 3D print PPE. As part of the effort, PPLD distributed several of its larger 3D printers to makers in the community who were then able to make face shield parts in the safety of their own homes. The District staff also used sewing machines and smaller 3D printers to assist in this vital work.
For nearly 60 years, Pikes Peak Library District has welcomed all members of their local community to enrich their minds, make connections, and reach their full potential. Through innovative initiatives and programming, resourcefulness, and responsiveness to the needs of their patrons, the District is truly living its mission to provide library resources and services that impact lives and build community across El Paso County.
")
Link to tutorial on YouTube: https://youtu.be/vJyL_xqPI0E
Supplies needed:
- Book template printed on cardstock
- Book cover printed on paper
- Glue Stick
- Blank paper
- Needle & thread
- Jump ring
- Optional: Key chain ring or necklace chord
Directions:
- Cut out a cardstock book template and the book cover of your choice (see pdf files below).
- Use the glue stick to glue the cover to the book template.
- Crease the flaps around the edges.
- Cut out 4-6 rectangles that you will fold in half to make the book’s pages. You can eyeball this, but they will be approximately 4.75 cm x 3.5 cm.
- Line up the pages and fold in half. This stack of folded pages is called a “signature”. Trim if necessary so that the pages fit in the book.
- Thread a needle with about 6 inches of thread.
- Sew the pages together with a pamphlet stitch. You will be poking 3 holes in the crease of the folded pages: one in the top, one in the middle, and one in the bottom. You can mark these holes with pencil beforehand if you would like to.
- Start by poking the needle in through the middle of the crease (see picture). The needle should go through the back of the pages and come out inside the inner fold. Leave a couple of inches of thread hanging out the back. Hold these 3 inches while you sew and do not let them pull through. You will be tying a knot with them at the end.
- Push the needle up through the top of the pages (inside to outside).
- Go back down near the bottom of the pages (outside to inside).
- Pull the needle one last time through the center hole.
- Use the thread you left hanging out the back and the thread still on the needle to tie a square knot—right over left, then left over right.
- Flip the cover template over, line up the pages of the signature you’ve just sewn, and use a glue stick to glue the leftmost and rightmost pages of the signature to the inside of the template.
- Run your glue stick over all the tabs of the cover template and then press them onto the two glued pages until the folio is fully secured to the cover template on both sides.
- Fold both sides of the spine with your fingers to finish your book!
- Now use the needle to poke a hole through the top of the spine all the way through to the inside. Widen the hole by wiggling the needle.
- Open a jump ring with your fingers by holding it in front of you and pulling one side forward while you push the other back. Do not open by pulling the sides outward or it will not fully close.
- Poke the jump ring through the hole you’ve created. You may have to go back and widen the hole further. At this point, you can attach a key ring to it or string it on a chord to make a necklace. Close the jump ring when you’re done!
- Voila! You have a miniature book charm. If you want it to lay flat, you can place it under a light object/between two objects overnight to make it stay fully closed. You could optionally paint it with mod podge to keep it safe from wear and tear!
Show off what you've made by entering our PPLD Challenge: Banned Books Art.

At Pikes Peak Library District, you can do anything you set your mind to. We, of course, offer books at each of our libraries. But did you know you can also get help with at-home education, do virtual yoga, learn a new language, discover your family tree, stream music, watch movies, and more? PPLD offers so many exciting things, it’s hard to capture them all! Learn more about what all you can access with your library card below. Thanks to the public’s investment and taxpayer support, Pikes Peak Library District can provide Library resources and services to all cardholders for free. You can learn more about PPLD's budget and expenditures here.
My Library: Kids and Teens Edition!
Getting your Library Card
- Stop by a PPLD Library to register for a card
- OR: Print a Library Card Application (en español), fill it out, and bring it in
- OR: Apply for a library card online for limited access
- Head to your favorite Library with your photo I.D. and proof of address to activate your full privilege account
Click here to learn more about library cards.
My Account
From managing your holds, Interlibrary Loans, set notification preferences, and more! Click here to learn more about My Account.
Download the App
The Catalog
Find books, eBooks, audiobooks, music, movies, video games, board games, and more! Click here for instructions on using the Catalog.
Programs
Click here to see our full calendar of events.
Meeting and Study Rooms
From a study room for one, to a venue space for large events and productions, we have a space to suit your needs.
eBooks
Audiobooks
Movies & TV Shows
Music
Magazines & Newspapers
Makerspaces
PPLD’s makerspaces offer access to tools, materials, and machines to help bring your creative vision to life. In these spaces, you’ll find equipment such as 3D printers, laser engraving & cutting machines, sewing machines, and assorted handicraft and art tools. Reservations are recommended for makerspace equipment. Find out what's available and plan your project. We also have a partnership with the Manitou Art Center allowing patrons to use their makerspace equipment. Go to the MAC page to find out more.
Studios
PPLD’s studios offer access to equipment and tools to help bring your recording desires to life. In these spaces, you’ll find items such as DSLR cameras, audio mixers, isolated sound booths, microphones, musical instruments, professional-grade video cameras and lighting, and even a green screen. Learn more about the studios by selecting a location below. Explore Studio equipment that’s available for reservation and checkout.
eLearning
Find help and support for your at-home learning endeavors at ppld.org/eLearning.
Languages
Genealogy Research
- Genealogy Toolkit
- Regional History Digital Collections
- Photo Archives
- Colorado Historic Newspaper Collection
- Archives and Manuscripts
- Access Ancestry.com
Homework & Homeschool Help
Personal & Professional Development
- English as a Second Language (ESL)
- Career Online High School (COHS)
- GED / HiSET
- Food Industry Training
- Job Search
- Career Prep
- Resume and Cover Letter Assistance
- Interview Prep
Databases
Research Guides
And More...

Missing Storytime at your favorite Library? Our Family and Children's Services librarians are creating Storytime at Home materials for you and you family to enjoy. Every themed Storytime includes top literary picks with easy links to our online Catalog, music, crafting, and literacy tips. Click the photos or the link for more information about each activity.
Get yours by following @PPLDKids on Facebook or get them straight to your email! Subscribe here!
All Storytimes:

2020 is certainly a year that we will forever remember. The COVID-19 pandemic has forced us all to flex and develop our 21st Century Skills (communication, collaboration, critical thinking, and creativity) in order to reinvent our way of life and stay connected to our community. Faced with these challenges, local artist Cara McKinley has worked with PPLD’s Creative Services staff to completely reinvent and rebuild the annual Maker in Residence Program (MIR), adapting it to meet social-distancing needs.
Explore Fall Maker in Residence Create Together: Community Build to learn about the collaborative art project!
Classes
In place of in-person classes, Cara has created skill-based project videos that introduce the viewer to traditional clay ceramic and assemblage skills using non-traditional, sustainable materials readily available at home. We encourage you to follow along with the projects using your own materials, so we’ve provided a suggested supply list with each video so that you can participate at your own convenience.
Recognizing the value of direct interaction, we also scheduled several MIR Live Chats to provide community members with an opportunity to chat with Cara and ask her questions about the videos and her art style, connect with other community members, and show off their finished pieces.
- Clay Dig
- Clay Dig part one: A quick tutorial on how to find and dig clay, overviewing what properties or characteristics to look for when digging, with conscientious and ethical dig considerations included.
- Clay Dig part two: Using the locally-sourced clay from part one, learn to create a small pinched object, and get a sneak peek into the Community Build projects that you'll find at PPLD Libraries across the Pikes Peak region!
- Supplies: backyard clay (or air dry clay), plastic knife, plastic fork, pencil or pen
- Optional: water cup, paint brush, inspiration foliage (leaves and flowers to press into the clay), pigment (tempera, acrylic, latex, glitter, etc.)
- Sand Sculpture
- Sand Sculptures part one: Using a tinfoil sculpted form as the base, this sandsculpting method of faux concrete sculpture incorporates glue, dirt, and pigment found in the home to coat the tinfoil form. See what other objects and materials can be added to create visual interest.
- Supplies: Elmer's Glue (all purpose), dirt/sand from your yard (play sand works too), tinfoil, mixing cup, parchment paper
- Optional: paint (latex, acrylic, or spray)
- Sand Sculptures part two: For the sandcasting technique, use sand, glue, plastic, and different types of color such as food coloring or acrylic paint to create a one-part mold casting. Make and pour your own mixture into your favorite shapes in a form made from sand! Create one, two, or ten... you're the artist!
- Supplies: Elmer's Glue (all purpose), dirt/sand from your yard (play sand works too), shallow container (or box lid), recycled plastic, parchment paper, fibrous string (yarn, rope, fabric strips), old brush or mixing stick, mixing cup, food coloring or pigment (watercolor paint, tempera), permanent marker
- Optional: glitter, rhinestones, sequins, other found additions, tinfoil
- Sand Sculptures part one: Using a tinfoil sculpted form as the base, this sandsculpting method of faux concrete sculpture incorporates glue, dirt, and pigment found in the home to coat the tinfoil form. See what other objects and materials can be added to create visual interest.
- Plastic Reboot
- Plastic Reboot: Using simple and complex building methods, along with previous techniques (introduced in Clay Dig & Sand Sculptures), learn to reshape plastic using scissors, a nail file, and connection styles (maybe even some packaging tape). The everyday bottle is transformed into a treasure that catches light using rethought objects from your surroundings.
- Supplies: plastic (found or collected), scissors, permanent marker
- Optional: packaging tape (clear), nail file, pliers, drill XACTO, glue pigment mixture (or nail polish), wire, glitter, rhinestones, sequins, tinfoil, additional found objects
- Plastic Reboot: Using simple and complex building methods, along with previous techniques (introduced in Clay Dig & Sand Sculptures), learn to reshape plastic using scissors, a nail file, and connection styles (maybe even some packaging tape). The everyday bottle is transformed into a treasure that catches light using rethought objects from your surroundings.
- Maker Challenges
Maker in Residence Cara McKinley wants you to pick a challenge from this video to complete in just an hour! Watch the video for inspiration prompts such as...- Make a tree ornament that you would want to live in if you were a bird
- Make an instrument as tall and as wide as your body out of household objects and materials
Watch the video to find more creative challenges!
- Assembled Objects
Here’s your chance to get a brief look at Cara McKinley’s studio while she explains why she enjoys working with natural and recycled materials and explains the importance of assembling objects to make art.
The Maker
 A transplanted surfer from South Florida, Cara has always been enthralled in looking at the natural world. After completing her Post Baccalaureate Studies at Indiana University Bloomington and Master of Fine Arts in Ceramics at the University of Tennessee in Knoxville, Cara moved to the rocky terrain of Colorado to recreate her observations in clay and multimedia. Using video, sculpture, installation and assemblage allows her the opportunity to indulge in the essence of an object and her world to create a shared reality. She makes in variable spaces in a continuous process of play using traditional and non-traditional media. Household objects, found items and natural materials such as sticks, sand, clay, tinfoil, metal, and glass express a way to enjoy and pay homage to nature.

The 2020 school year will look different for all of us, regardless what learning method your family has chosen for your students. Pikes Peak Library District has tools and resources to support you in your education journey this year!
Homework Resources Guide
First stop: get your card.
- Either stop by a PPLD facility to sign up, or print out an application ahead of time to bring with you (located here).
- OR
- Apply for a card online!
- You must live within the PPLD service area
- You will need proof of your current address and a photo ID
- If you're 15-years-old or younger, you must be accompanied by a parent or guardian.
Learn more about the Library's response to Covid-19.
Brainfuse
Live homework help and skills building online with expert tutors in math, science, social studies, and English, plus writing and reading assistance.
Peterson's Test Prep
Study Guides and Practice Tests:
This database provides study guides and timed practice exams for all major college entrance exams and standardized tests, plus college planning, scholarship search, and career exploration tools.
Databases
These platforms provide high-quality educational content and are fun to explore! Access is free with a valid library card and pin number. Databases include:
- Academic Search Premier: Contains full text for more than 2,000 journals, including more than 1,550 peer-reviewed titles. This multi-disciplinary database covers virtually every area of academic study.
- Consumer Health Complete:A comprehensive full-text resource for consumer-oriented health content covering all areas of health and wellness from mainstream medicine to the many perspectives of complementary, holistic and integrated medicine.
- CultureGrams: Includes over 200 reports on countries and cultures and state reports outlining the diversity and history of each U.S. state and the District of Columbia. Designed for upper elementary-aged children
- Gale Virtual Reference Library: Searches our entire collection of Gale eBooks on a variety of subjects, including history, science, government, and more.
- CustomGuide: Interactive online training for Microsoft Office software. Includes Access, Excel, Outlook, PowerPoint, Windows and Word. New users will need to create an account.
- LinkedIn Learning: Formerly Lynda.com, LinkedIn Learning offers online video tutorials to help you learn software, creative, and business skills.
- Opposing Viewpoints in Context: Explore current events and controversial issues by researching multiple sides of a topic. This database aids students in writing argumentative essays and developing analytical thinking skills.
- Science Reference Center: Provides easy access to a multitude of full-text, science-oriented content. Designed to meet every student researcher's needs, Science Reference Center contains full text for 732+ science encyclopedias and reference books, 195 periodicals, 519 science videos and other sources.
Online Resource Guides
Librarian-Approved Info on Tons of Topics!
Your source for research assistance, subject guides, and library resources.
- Tough topics like mental health, substance abuse, and sexuality.
- Areas of personal growth like exploring career pathways, college financial aid, and ACT, SAT, and GRE testing.
- Beginning the transitions into driving and vehicle registration, including CO DMV practice tests.
Mango Languages
Ready to expand your horizons by learning a new language? Mango Languages features 70 language options, including 21 options for those learning English as a second language. Explore languages from Irish to Punjabi in the comfort of your own home, or download the app to learn on the go! Students can go at their own pace. The courses have been created by expert linguists and native-speaking instructors to ensure that the content is grammatically and conversationally correct, as well as culturally relevant.
Workforce Readiness Training
Get ready to get a job or go to college! Work your way through modules focused on professionalism, communication, social skills, and goal setting to prepare yourself for the next big step in your life. Folks below age 15 should focus on the “basic” training while older youth might find the “intermediate” training more appropriate. Complete the training and pass an assessment to earn 10 hours of volunteer credit!
The Homeschool Hub
The PPLD Homeschool Hub has a wealth of resources and tools to support your learning at home efforts. You can also sign up for their newsletter here. Click on “Resources” to find information on getting started; Colorado homeschool law, online courses, concurrent enrollment, and enrichment programs; tutoring; extracurricular activities; support organizations; and more.
Featured Homeschool Resources Whether you are homeschooling full- or part-time, or simply looking for ways to enrich your child’s education, the online resources featured in this issue provide a variety of elucidating and engaging possibilities.
- Learning Heroes This site provides parents with a picture of their child’s learning needs along with tools to bolster their academic, social, and emotional development. A “Readiness Check” with short questions about reading or math for grades K - 8 will show you where your student stands. You’ll also find learning aids by subject and grade level, ways to identify a child’s character strengths and areas for development, an idea-packed “Anti-Racism Resources Directory,” and more. It’s also accessible in Spanish!
- GreatSchools This resource helps with developing “Emotional Smarts,” learning issues, building character, college prep, and more. A “What Your Child Should Have Learned” section outlines key academic and social benchmarks typical for grades K - 8 along with specific subject check-ins aligned with Common Core State Standards. Short “Milestones” videos clarify grade level expectations by demonstrating what success looks like in reading, writing, and math in grades K - 12. Parents can also access learning activities, vocab words, worksheets, and more by grade level. It’s also accessible in Spanish!
- Khan Academy This site provides free standards-aligned video tutorials and interactive exercises in math, science, and the humanities from kindergarten through the early years of college. The self-paced lessons are organized to build knowledge one concept at a time. Create a free account to track a student’s progress, chart subject mastery, and support their learning needs. Use Khan Academy to tackle new coursework, fill in gaps for subjects already learned, homework help, or as a fun activity. It’s accessible in numerous languages!
- Understood Understood is aimed at supporting kids with learning and thinking differences, like dyslexia and ADHD, by offering customized, accessible resources and a compassionate community. The “For Families” section organizes articles and resources into general topics: understanding and navigating learning and thinking differences; school and learning issues; socio-emotional development; community, including blogs and discussion groups; and “Through Your Child’s Eyes,” interactive simulations to help parents better understand their child’s world. It’s also accessible in Spanish!
- Wide Open School This site offers engaging, high-quality online learning experiences for kids pre-K - 12. Parents can access the content by subject, or plan a full school day by grade level. Other sections are dedicated to virtual field trips, art and music, physical activity, emotional well-being, English-language learners, learning differences, and more.
For Fun AND Learning!
eLibrary: More than Books!
This is the place to go for thousands of free digital materials. First, you'll need to create an account using your library card number and pin. Some services in the eLibrary include OverDrive (eBooks, eAudios, eVideos), Hoopla ( eMusic, eVideos, eComics, eBooks, eAudios), AudioBookCloud (eAudios), Freading (eBooks), Freegal (eMusic), Kanopy (eVideos), and more.
PPLD Kids
You can find plenty of PPLD resources here! Explore:
- Homework (search by subject to find databases, recommended websites, and more),
- Read (access booklists by grade level, genre, online resources, and more),
- Create (hands-on activities and websites),
- or Parents & Educators (curated information source for adults).
PPLD Teens
Get homework help, book recommendations, virtual programs, research resources, and more!
Tumble Book Library
eBooks for Kids!
This curated database of children’s eBooks offers over 1000 titles for kids in grades K - 6. Included are animated talking picture books, read-along chapter books, National Geographic videos, non-fiction books, literacy puzzles and games, books in Spanish and French, and graphic novels (a fan favorite!). Younger kids will enjoy listening to the stories while perusing the illustrations, while older or more accomplished readers can choose from the collection of read-along books featuring narration, sentence highlighting, and automatic page-turning. Each book is accompanied by a reading level, Lexile level, and grade information, plus an optional quiz. There are no limited check-out times or wait lists, so every item is always available to everyone.
The results are in! The Betty Field Youth Memorial Writing Contest, sponsored by the Friends of Pikes Peak Library District, is writing contest for youth in grades 6-12 that focuses on mystery stories. This year, 90 students submitted stories to the contest. These submissions were judged anonymously by volunteers from the Friends of the Library and Pikes Peak Library District staff, who entered over 400 scores for the stories!
6th Grade:
- 1st place: "Pluto Found Missing" by Madalynn Moorhead
- 2nd place: "Friend or Foe?" by Tristan Kumar
- 3rd place: "The Girl Erased from Time" by Hudson Sheperd
7th Grade:
- 1st place: "Scootered" by Jace Baehman
- 2nd place: "The Dissociative Killer" by Raina Seybert
- 3rd place: "The Case of the Cullinan Diamond" Daniel Bloomfield
8th Grade:
- 1st place: "Buried Memories" by Isabelle McNett
- 2nd place: "A Walk in the Woods" by Marian Griffiths
- 3rd place: "A Hole in the Roof" by Cannon Lockburner
9th and 10th Grade:
- 1st place: "Provocation" by Elaine Zou
- 2nd place: "Blue Girls and Zombie Kits" by Riley Ferl
- 3rd place: "The Ridge" by Angel Jimenez
11th and 12th Grade:
- 1st place: "The Puppetmaster" by Sierra Montgomery
- 2nd place: "Mystery of the Missing Happiness" by Evelyn Peake
- 3rd place: "An Odious Case" by Christian Alvis
Winners will be contacted via email with information about their prizes.

Supplies:
- Tall, clear glass cylinder vase or container (preferably straight)
- Food coloring
- Measuring cup
- Order of liquids needed for this density "burrito" (but you could do less liquid choices, but make sure to start with a heavy liquid and end with the lightest liquid):
- Honey
- Corn Syrup (add a couple drops of food coloring)
- Maple Syrup
- Whole Milk
- Dish Soap
- Water (add a couple drops of food coloring)
- Vegetable Oil (add a couple drops of food coloring)
- Rubbing Alcohol (add a couple drops of food coloring)
- Lamp Oil (DO NOT add food coloring to this liquid - it's doesn't mix in.)
- Tray
- Turkey Baster
- Items to sink or float: ping-pong ball, plastic beads, metal bolt, grape or cherry tomato, etc.
Directions:
- Determine how many ounces your container holds with room to spare at the top. Round up or down to a number that can easily be divided your number of liquid layers. Measure the exact amount of liquid ingredients into separate containers. (My large container held about 32 oz. leaving room at the top, so I divided 32 by 9, and then rounded the number down to a 1/3 c. of each liquid to make it easy to measure. Have a grown-up help you, especially with the lamp oil.)
- Place the large container on the tray.
- Add the liquids IN ORDER (they go from most dense to least dense).
- Starting with the honey, pour it very slowly so that it doesn't touch the sides of the container.
- Next, very slowly, dribble the corn syrup on top of the honey. Don't let it touch the sides of the container either.
- Again like the first two, slowly dribble the maple syrup into the container on top of the corn syrup.
- Using the turkey baster, add the milk very slowly. Now it helps to pour the liquids slowly down the sides of the container as you add them. You will add the next five liquids in the same manner.
- When all the liquids are in place. Add items and watch them sink or float or get stuck, depending on their weight and the density of the liquid where it stops.
Watch this project at: https://youtu.be/QjEYa6xBVRQ?list=PLMEg2Dd0dSFctLfDQxsL5SmuE8zkwQFmu

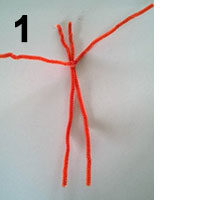
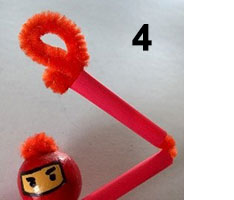
Supplies:
- 3 chenille stems for each figure
- 1 wooden bead big enough to be the head – 5/8 to 3/4 inch
- 1 or 2 regular-sized colored plastic drinking straws for each figure
- 5 pony beads for each figure
- Small wire cutters
- Scissors
- Ruler
- Permanent markers for the face
- Glue
- Optional: Yarn, extra chenille stems, felt scraps, or other decorative items
Directions:
- Take one of the chenille stems and twist it around the other two about 2/3 of the way up; twist about three times, or enough so that they will not unwind. (See #1 picture below)
- Slide 3 pony beads over both of the “legs” up to the twist you made.
- With the permanent marker, draw a face on the bead; then slide the bead down over the middle two stems.(See #2 picture)
- Cut off some of the excess stem above the bead, but leave enough to coil it into a bun. Use a little glue to glue the bun flat to the “head.” (Alternate method: Cut several strands of yarn for hair and twist the excess stem over it to hold it in place.)
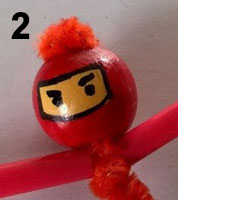
- With the scissors, snip eight sections of colored straw about 1 ¼ inches long.
- Slide two of the sections over the “arms.” Twist the part of the stem that is sticking out to form mitten-type hands with thumbs. Tuck the excess stem back into the straw. (See #3 and #4 pictures)
- Slide a section of the straw over each “leg;” add a pony bead, and then the other section of straw. Form the part of the stem that is sticking out into a big foot so your figure can stand up. Tuck the excess stem back into the straw.
- If you want, you can decorate your figure with extra chenille stems, felt, yarn, or whatever you happen to have. You can make warriors, princesses, superheroes, knights – anything you want! (See #5 picture)

Watch this project at: https://youtu.be/UnGxbypCuBw?list=PLMEg2Dd0dSFctLfDQxsL5SmuE8zkwQFmu

Supplies:
For solution:
- Clean container, big enough to hold your solution
- Distilled water (tap water will work but distilled water is best)
- Dishwashing liquid like Dawn
- Glycerin
- White sugar
For Bubble cube:
- 7 pipe cleaners, cut in half
- 12 plastic straws, each one cut to fit a pipe cleaner half, with about ¼-½” of pipe cleaner left exposed at each end
- For the bubble blower, you’ll need a plastic pipette. Just snip ½” off the bulb end of the
pipette. This is the end you’ll dip into the bubble solution.
Directions:
- Start with a clean container that will hold as much solution as you plan to make.
- Add distilled water (tap water can be substituted, but the minerals in it will affect the bubbles), in 1 cup increments.
- For each cup of distilled water, add 2 Tbsp of dishwashing liquid (original Dawn works really well).
- For each cup of distilled water, add 1 Tbsp of glycerin (grocery story grade, or pharmaceutical grade).
- For each cup of distilled water, add 1 tsp of white sugar.
- Gently stir the ingredients in the container, being careful not to make it frothy and bubbly.
- Cover the container and place it in the refrigerator overnight.
Meanwhile... make a bubble cube and a bubble blower for your Bubble Magic …
- Twist 3 of the pipe cleaner halves together at one end to make a triangular, pyramid-shaped component. Use 12 of the pipe cleaner halves to make a total of 4 of these three-legged pieces.
- Slide a piece of straw onto each pipe cleaner leg, leaving ¼-½”” sticking out of the open end.
- To build the cube, twist each pipe cleaner end on one component to the ends on another component. Continue connecting the legs until the cube is complete. Try to make the shape as even as possible.
- Use the last two pieces of pipe cleaner for handles by twisting each piece onto the cube at opposite corners. Curve the “handle” ends to make a shape that you can easily hold onto.
Now to make Bubble Magic …
- Get the cold bubble solution from the refrigerator, and carefully stir the mixture. Avoid making froth and bubbles. Whenever that forms on the top, take a minute to skim it off with a spoon so that you’ll get better bubbles with your cube.
- Dip your cube into the solution, letting it sit there for a few seconds, and lift it out by holding on to the two handles. Gently shake the cube so that the soap film can even itself out and excess solution can drip back into your container.
- Gently shake the cube again so that you can see a new shape, with a “square” bubble in the center. Be sure the “square” is horizontal so that you can see the square when you look down into the cube from above it.
- Set the cube gently on a flat surface to keep the bubble film stable while you prepare a bubble with your pipette bubble blower, or ask a friend to blow a bubble with the pipette.
- Blow a pipette bubble and gently drop it right into the center of the square. And ...
TA-DAH! The round bubble you dropped into the cube “magically” turned into a bulging cube … a square bubble. Now that’s Bubble Magic!
*You can also use your bubble cube as a wand. Submerse it in the solution, lift it out carefully, and holding the handles, “pull” it through the air. Watch for a trail of connected spherical shapes!
Watch this project at : https://youtu.be/iY_0gSND-40?list=PLMEg2Dd0dSFctLfDQxsL5SmuE8zkwQFmu

Supplies:
- A piece of 8 ½ X 11 white cardstock
- Watercolor paints
- School glue
- Small bottle of black acrylic craft paint
- Small paintbrush
- Cup of water for rinsing your paintbrush
Directions:
- Print the half butterfly image provided (see below) onto your cardstock. Fold the cardstock exactly in half and then unfold to make a crease in the middle. (Alternate method: Draw a butterfly picture onto half of your cardstock with a pencil putting the exact middle of the butterfly on the crease.)
- Make black glue by adding black acrylic craft paint to a small bottle of plain school glue until a dark, black color is achieved. Mix well.
- Using the tip of the glue nozzle, trace a fine line of glue onto all of the printed lines of the butterfly picture. Don’t use too much glue! Put the glue on only the half of the picture with the copied lines. Leave the other half blank.
- Fold the paper in half again while the glue is wet and press together gently. Then open up the cardstock. The pattern you traced will now be duplicated on the other half of the cardstock.
- Let the glue dry. You can speed up the process by using a blow dryer on low heat to gently dry the glue.
- When the glue is completely dry, use your watercolors to color in all of the white sections. You can decide which colors to use!
Oops! My butterfly isn’t exactly the same on both sides. That’s okay! Real butterflies’ wings aren’t exactly the same on both sides, either! Just like with people’s faces, one side is slightly different than the other.
Watch this project at: https://youtu.be/Gimm3roL-3Q

Supplies:
- Clean, clear jar with lid
- Thin glow stick
- Scissors
- Table covering or tray
- Glitter (optional)
Directions:
- With a grown-up's help, cut the tip off the glow stick.
- Place the open end of the glow stick in the jar and shake it back and forth so that it splatters. Turn the jar as you splatter.
- Add a small pinch of glitter, sprinkling onto the sides of the jar where the splatters are.
- Cover with lid and take into a very dark room.
Fireflies are not flies but beetles and do exist in Colorado! They hang out by permanent water sources like ponds, lakes, and streams.
Watch this project at: https://youtu.be/LRNWJVQRFYw

Supplies:
- Embroidery or regular thread
- Piece of cotton fabric or item made of cotton
- Sewing needle
- Scissors
- Sharpie or other dark marker
Directions:
- Using a sharpie, mark dots on your fabric which will guide you as you sew your design.
- Thread your needle by pushing thread through the eye of the needle. Make a knot at the end of your piece of thread.
- Start on the wrong side of your fabric or on the inside of your item, and push the needle up through the fabric through your starting dot. Bring all the thread through, slowly, making sure the thread doesn't tangle.
- Go to the next dot in your design and push the needle down through that dot, bringing all the thread through again.
- Continue until your first design is complete. Finish your design by weaving your needle through the thread on the wrong side of the fabric several times, making a couple loops so the thread will be secure. Cut the thread.
- Re-thread for the next design or continue if you have enough thread on your needle.
- Enjoy your original design!
Watch this project at: https://youtu.be/5tX-0F2bAsA

Supplies:
- Baking soda (1/3 c.)
- Vinegar
- Small bowl
- Golf ball or other small ball that sinks and doesn't float
- Tray
- Paper towels
- Warm water (1 cup)
- Plastic wrap
- Food coloring
Directions:
- Put a golf ball in a small bowl. Cover both the ball and bowl with plastic wrap, making sure the wrap hangs out over the edge. Push the plastic wrap down around the ball.
- Mix a third cup baking soda into one cup of warm water and add food coloring. Mix well.
- Pour the mixture into the small bowl and over and around the golf ball. Make sure you cover the ball with the baking soda/water mixture. You may need to spoon in some of the baking soda that sits at the bottom of the bowl of warm water.
- Place the bowl in a flat place in the freezer. Freeze for at least 4 hrs.
- When frozen solid, place the bowl in warm water so the ice comes loose. Place on a tray and lift the volcano out of the bowl. Pry out the golf ball with a spoon and carefully remove the plastic wrap.
- Spoon on some vinegar and watch the icy volcano. This project is fun to do outside.
- Refreeze your volcano for another day, if there's anything left.
Watch this video at: https://www.youtube.com/watch?v=Wo3tfS85M4k&list=PLMEg2Dd0dSFctLfDQxsL5…

Supplies:
- Tablecloth
- Paints (any kind, or water colors could work too)
- Paintbrushes (any kind)
- Paint tray
- Tissue paper or construction paper (three sheets of different colors or just white works too)
- Cardboard
- Glue or Mod Podge
- Yarn or string
- Scissors
- Dowel(s) or a coat hanger or a branch with yarn or string tied on.
- Scissors
Directions:
- Cover your workspace with a table cloth or newspaper.
- Spread out your tissue paper (or construction paper).
- Apply paint to the tissue paper in broad strokes, (no need to cover the entire tissue paper with wet paint.) After the first color is dry, add another color. Let dry again before adding another color. Add designs too, like swirls or zigzags. Let tissue paper dry.
- Take cardboard and draw large shapes like a star, crescent moon, square, circle, etc. Cut out the shapes.
- When tissue paper is dry, tear into smaller pieces (but not tiny pieces).
- Water down some glue or use Mod Podge to cover a cardboard piece, then place a piece of painted tissue paper onto the glued piece of cardboard. Trim any excess tissue paper. Paint glue over the tissue paper too. Repeat with several shapes and allow all pieces to dry.
- With a grown-up's help, poke a hole at one end of each cardboard shape. Using different lengths of string or yarn, string up your shapes.
- Hang your stringed shapes from your branch or dowel. If you're using two dowels, you can tie them together first by crossing them and tying string or yarn where they intersect.
- Adjust your hanging shapes along the dowel so that it's balanced when it hangs. Hang your mobile art up for all to admire.
Watch this project at: https://www.youtube.com/watch?v=tl79U5s4GrA&list=PLMEg2Dd0dSFctLfDQxsL5…

Pikes Peak Library District Foundation is honored to receive $150,000 from the estate of Milt and Darlene Johnson.
As we have come to learn, Milt was what we at PPLD would refer to as a “power user.” While serving as the pharmacist at Broadmoor Drug at The Broadmoor Hotel, Milt often worked the 4-11 p.m. shift. With Dar teaching during the day, Milt became a mainstay at our Penrose Library where he spent countless hours educating himself on investments and investment strategies, pouring over resources such as The Wall Street Journal, the Financial Times, and Barron’s.
After he retired, Milt continued to visit the library almost daily and used the knowledge he gained at the library to build and grow his and Darlene’s investment portfolio. In fact, Milt became such a subject matter expert that many of the investment advisors he and Darlene used often called Milt for advice. We are grateful to be a recipient of their generosity, which based on this story, is due in part to the time Milt spent at Penrose Library. PPLD’s mission is to provide resources and opportunities that impact individual lives and build community, and we cannot think of a more compelling story that demonstrates the impact of patrons connecting with library resources and in this case quite literally building our community.
PPLD and the PPLD Foundation are truly grateful to Darlene and Milt for including the library as part of the imprint these gifts will forever leave on our region, and we are deeply touched by Darlene’s gesture to make the gift to PPLD in Milt’s memory. The PPLD Foundation was created in 2003 to raise philanthropic funds and build an endowment to support our 15 libraries and the more than 650,000 people we serve. PPLD ranks 10th out of Colorado’s 13 largest library systems in funding per person, and the PPLD Foundation was created to accept meaningful, generous gifts like Darlene’s. It is donations large and small that helps PPLD close our funding gap and continue providing resources and opportunities that impact individual lives and build community. We are truly sorry to have lost Darlene and Milt, but these gifts will ensure their legacy is forever remembered.
Read more about the Johnsons and their estate in The Gazette's coverage here.
Photo credit: Joe Hollmann and the City of Colorado Springs
For more information on how you can include PPLD in your estate planning and create your own lasting legacy, contact Lance James at (719) 531-6333, x6890, or email foundation@ppld.org.

In commemoration of Colorado History, join Regional History and Genealogy staff members as we view selected Rocky Mountain PBS Colorado Experience documentaries. Watch award-winning documentaries and chat about our state's unique history. Participants will learn about our state and community from the comfort of your home.
Register for one intriguing topic or the whole series. Click here to register for the whole series.
Registration is required.
Topics
Glen Eyrie Castle
- Mon., Aug. 10 at 6:30 p.m.
Enter the fascinating history of Colorado Springs’ founding estate. How did a refined English Tudor-style castle come to exist in the vast, unsettled West? Created by railroad tycoon and Civil War General William Jackson Palmer, Glen Eyrie Castle is adjacent to Garden of the Gods and the iconic views of Pikes Peak. Brand new archeological findings reveal intriguing details of castle life!
Ladies of the Mine
- Fri., Aug. 14 at 2 p.m.
- Click here to register.
High altitude, groceries delivered by mule train, pack rats and spoiled Thanksgiving turkeys are just a few of the challenges faced by ladies living in Colorado's remote mining towns at the end of the 19th Century. Learn the stories of three inspirational women who held their own while surrounded by a harsh landscape and un-lady-like company.
Suffrage
- Tue., Aug. 18 at 11 a.m.
- Click here to register.
On November 7, 1893, Colorado became the first state in the nation to grant women’s suffrage by a single issue popular vote, and the following year the first three female state legislators were elected. Meet the dedicated Colorado women that led this charge. Today, Colorado has the highest percentage of women in the state legislature.
KKK
- Thu., Aug. 20 at 7 p.m.
- Click here to register.
From the Grand Dragon to known KKK appointees in the police, mayor and governor offices, Colorado once had the 2nd largest Ku Klux Klan membership in the United States. Discover the sordid history of the KKK in Colorado and the impact they had on Catholics, Jews and African Americans in early 1920s, and the courageous individuals who fought against their establishment.
Cheers to Beers!
- Fri., Aug. 27 at 6 p.m.
- Click here to register.
The history of Colorado may best be seen through the bottom of a beer mug. From quenching the thirst of Gold Rush miners in the 1800's to modern craft brews pouring $3 billion into Colorado’s economy, beer has either borne witness to or helped create some of the most interesting chapters in the state’s history. Meet the pioneers of this now booming industry. Cheers!
We hope you enjoy the 23rd edition of Stone Soup, published by the Adult Education Department of Pikes Peak Library District.
These stories are written by adult participants and volunteers. They are offered as submitted.

SUPPLIES AND INGREDIENTS:
- ½ cup 49 Volume Hydrogen Peroxide (*3% solution, first aid quality, will work … it produces a smaller reaction)
- 1 TBSP liquid dish soap
- 1 packet (1 TBSP) Active Dry Yeast
- 4 TBSP warm water
- Plastic Cup for mixing yeast and water
- Food coloring
- Plastic soda bottle (*16 oz. - 1 liter)
- Washable or protected work surface
- Foil Tray with high sides and/or Larger cookie sheet or tray with sides
- Funnel (optional)
- *Safety goggles (*or … ski/snow goggles, swim goggles) … for general eye protection!
DIRECTIONS:
To make up a batch of hippopotamus toothpaste …
- Place the soda bottle in your tray(s) … on a washable, protected surface.
- Pour 150 ml (½ cup) of 40 Volume Hydrogen Peroxide into the soda bottle.
- Add 1 tablespoon of liquid dishwashing soap to the bottle.
- Pour the packet of yeast into the small cup.
- Pour 4 tablespoons of warm water over the yeast.
- Carefully swirl the cup around to further mix the yeast and water. *It should be the consistency of melted ice cream. Allow about 30 seconds. Add a bit more warm water, if needed.
- Dribble several stripes of food coloring down the inside of the soda bottle. This should produce stripes, just like you might see in real toothpaste.
- Pour the yeast solution into the soda bottle … and stand back! Watch the mixture expand and foam up.
(You might want to use a funnel for this!)
*Once the chemical reaction is complete, you should have (mostly) just soapy water and yeast. However, if you used the Volume 40 product, and some of the peroxide was unreached in the experiment, it could irritate skin and eyes. For that reason, it’s
recommended that you don’t play with the foam! And DON’T BRUSH ANY TEETH WITH THIS FOAM!
How It Works …
Each tiny foam bubble in this chemical reaction is filled with oxygen. The yeast is a catalyst, a substance that speeds up a reaction. It quickly broke apart the oxygen from the hydrogen peroxide … and that created lots and lots of bubbles! Your experiment not only created bubbles, but also heat … that makes it an EXOTHERMIC reaction.
Clean Up …
It’s safe to use a sponge to wipe up foam from your table surface, and just wash the remaining liquid and foam from the bottle and tray down the sink drain.
Watch this project at: https://youtu.be/N91i9ih62ZM?list=PLMEg2Dd0dSFctLfDQxsL5SmuE8zkwQFmu

Supplies:
- Watercolors
- Cup of water
- Paint brush
- Pencil
- Black crayon or oil pastel
- White watercolor paper or heavy cardstock
- Black cardstock or construction paper
- White school glue
- Glue stick
- Optional: popsicle stick or toothpicks to spread glue
Directions:
Oil Pastel & Glue Watercolor Stained Glass
- Lightly draw a stained-glass design with pencil on your white paper.
- Outline the stained-glass design with black pastel or crayon.
- Working section by section, wet a section of your design with a paintbrush and plain water. Dab watercolor in that section. Feel free to mix colors.
- Repeat for each section of your design, wetting the paper first, before adding paint.
- Let your design dry.
- Outline each section of your design with glue, inside the black lines.
- Spread glue in each section.
- Let your project dry.
- Finished!
Collage-style Stained Glass
- You will need a sheet of black cardstock or construction paper to be the background of your final project.
- Lightly draw a stained-glass design with pencil on your white watercolor paper.
- Working section by section, wet a section of your design with a paintbrush and plain water. Dab watercolor in that section. Feel free to mix colors.
- Repeat for each section of your design, wetting the paper first, before adding paint.
- Let your design dry.
- Cut out each section of your design.
- Lay out your cutout pieces on the black paper.
- Once you like the arrangement, glue down each piece to the black paper with a glue stick.
- Finished!
Watch this project at: https://www.youtube.com/watch?v=vu2UYBh1G3w&list=PLxg4vmuqrAtckvp9eurSG…

SUPPLIES:
- Coffee or Oats Can (empty)
- Thick Rubber Bands
- Medium / Large Hex Nut
- Paper Clips (Large and Small)
- Nail / Hammer
- Screwdriver
- Tape
- Pencil (*optional)
- Colored paper, tape, and stickers for decoration (*optional)
DIRECTIONS:
- Poke a hole in the center of the coffee / oats can top and bottom using a hammer and nail.
- Enlarge the hole by tapping a screwdriver through the hole with a hammer.
- Tape your rubber band to the top of the large nut. Make sure it’s centered and very secure! (*Depending on the size of your can, you may need to knot two bands together so that there’s not too much tension on them.)
- Open up a small paper clip and thread it through one loop of the rubber band. This will be your “needle.”
- From the inside of the can, very carefully “thread” the paper clip (with the rubber band attached) through the hole in the bottom of the can. There may be sharp edges, so be careful! Slip a large paper clip through the rubber band loop to secure it in place. Remove the paper clip “needle.”
- Place the paper clip “needle” through the remaining loop of the rubber band and carefully pull it through the hole in the coffee / oats can lid. (If the hex nut has moved closer to one side of the rubber band, move it back so that it hangs on the center of the can when stretched.) (*If necessary, place the pencil between the lid and can to temporarily hold everything in place.)
- Slip another large paper clip through the rubber band loop to secure it in place. Remove the paper clip “needle” and the pencil. Make sure the lid is attached securely to the can!
- If you’d like, decorate your can with colored paper, tape, and stickers. Time for testing! On a flat, smooth surface, gently roll your can away from you. Just before it mysteriously begins to roll back, summon your super powers and call the can back to you. A little “hocus pocus” or “abracadabra” will convince your audience of the magic.
*Troubleshooting : Be sure to use thick rubber bands that will store up enough energy to cause the can to roll back to you. Also check that your hex nut is not touching the side of the can. If it is, use a shorter rubber band or knot your rubber band. If just one band is too short and tight, knot two rubber bands together. You can also thread an extra hex nut onto the outside top and bottom of the can as spacers if your rubber band(s) are too long. Experiment and you’ll get it just right.
Watch this project at: https://youtu.be/Hk1OthEqSfs

Supplies:
- Boxes
- Paper
- Any random materials – bottle caps, beads, egg cartons, cds, etc.
- Scissors
- Adhesive – glue, stickers, etc.
Directions:
Use these found, recycled items to make your own creation.
Watch this project at: https://youtu.be/Zc1PUl5WCSw

Supplies:
- One plastic bottle along with its lid, about the size of a disposable water bottle (it can be a drink bottle, shampoo bottle, catsup bottle, mustard bottle, or any other clean, plastic bottle.) You can experiment with bottles of different shapes and sizes!
- Two chopsticks, new pencils, sturdy skewers, or any other straight sticks of equal size; they must be long enough to fit at least halfway along the edge of your bottle and then hang off the end by 4 to 5 inches.
- Thick foam board OR plastic carton(like a whipped cream tub or kitchen wipes container) OR two disposable plastic spoons
- Rubber bands of different sizes
- Duct tape or packing tape
- Scissors
- Paper
- Ruler
- Permanent marker
Directions:
- Line up your two sticks on opposite sides and along the length of your clean bottle; tape into place using the duct tape or packing tape (or use rubber bands if you have no tape.)
- Slide a rubber band over the ends of the sticks. Your rubber band should be taut without falling off but not so tight that it bends your sticks inward. If your rubber band is too big, try doubling it. It helps to loop the rubber band around each stick so it doesn’t fall off.
- Trace and cut a 2 inch X 3 inch template from the paper. Then use the paper template to trace 4 rectangles on the sides, bottom, or lid of a plastic container and cut them out.* The plastic should be soft enough to bend. Bend each piece in half; then use narrow pieces of duct tape to hold the pieces together with the curves flaring in opposite directions and all the bends in the middle.
- Slide your curved, taped plastic carton pieces or your taped spoons or your joined foam pieces between the sides of the rubber band. This is your paddle! At this point, you can tape the paddle to the rubber band.
- Try it out! You can sail your paddle boat in the bathtub, in a pond or quiet stream, or in a swimming or kiddie pool. Wind the paddle within the rubber band. Do it several times, but don’t wind it so much that it snaps. With the paddle still wound, set your boat gently in the water and let it go!
(Watch this project at: https://youtu.be/aFYJ9Aga7VY?list=PLxg4vmuqrAte4QgWzVQ7oInsSnnMkwcil)
* Caution: Some plastics become sharp when cut. Get an adult’s help if you need it!
Alternate method: Using a wire cutter or strong scissors, trim the handles of two plastic spoons so that they are 2 ½ inches long; use a narrow piece of duct tape to hold the spoons together along the short handle with one spoon facing up and one spoon facing down.
Second alternate method: Cut two 3 inch squares out of thick foam board and cut a slit just to the middle of each so that they can slide together.
The Science behind this Project:
The wound rubber band stores energy. The more you wind it the more energy is stored. The term for stored energy is “potential energy.” When you release the rubber band, the “potential energy” is converted into “kinetic energy,” or the energy of motion.
More experimentation:
Does the boat go faster or slower if the paddle is moved closer to the boat?
Does the boat go backwards if the paddle is wound in the other direction?
Does a big boat go faster or slower than a small boat?
When your boat is in the water, can you spot other forms of kinetic energy caused by the boat’s motion?
Can you think of other examples of potential and kinetic energy?
More ideas:
Make a balloon powered car
Make a rubber band helicopter

Supplies:
- 8 ½ x11” sheets of colored cardstock or heavyweight construction paper
- Scissors
- Colored dot stickers or other small stickers- optional
- Scraps of colorful/decorative papers- optional
- Hole punch
- Glue stick
Directions:
- Fold an 8 ½ x 11” sheet of cardstock or heavy construction paper in half OR cut the sheet to a smaller size, then fold in half, making a strong crease on the fold line.
- Holding onto the folded side of your paper with one hand, give the top of your paper a decorative trim. Still holding the folded side with one hand, begin cutting 1” in from the open side, starting at the bottom of your paper. Let the outside edge guide your cutting line. STOP when you are about 1” from the top of your paper. Turn the corner with your scissors and cut across the paper, toward the fold. STOP about ¼” from the fold!
- Repeat the cutting from the bottom of your paper, always moving over about 1” from your previous cut before beginning. You can make your vertical and horizontal cuts straight or decorative. Making lines and curves, play around with each sculpture you create, giving your pieces some variety!
- When you have made 3-4 cutting lines, depending on the size of your paper, open up your paper and lay it on a flat surface. You can decorate your paper, front and back, using stickers or scraps of paper.
- Turn your paper into a 3-D sculpture with a few folds: Beginning on one side of your sculpture, fold the top “leg” TOWARD the center, creasing a new fold at the end of your scissor cut (where you stopped about ¼” from the main fold line). The next “leg” should be folded BACKWARD in the same manner. Continue, folding each leg ... front, back ... in this alternating pattern. Do the same thing on the other side, BUT the top “leg” will be folded backward. Continue the folding pattern ... front, back, front.
- Display your 3-D sculpture by working with the “legs” and folds to make it stand. Make a few more, varying the size of your paper, cutting lines, and decorations to grow your piece into an artistic stabile (a freestanding abstract sculpture) that POPS!
Watch this project at: https://www.youtube.com/watch?v=NPxBwVPqYR4&list=PLxg4vmuqrAtckvp9eurSG…